Polycarbonate canopy attached to the house photo: instructions. Do-it-yourself polycarbonate canopies for a private house: a photo of modern hinged structures From which profile to make a canopy for polycarbonate
With the advent of such material as polycarbonate, the process of manufacturing various canopies and visors has been greatly simplified. The excellent strength and flexibility of this product allows you to create the most complex structures with unusual geometry. At the same time, ease of installation allows you to create a canopy made of polycarbonate with your own hands, even for novice craftsmen.
What you need to know
Before starting work, it is necessary to carefully study the types this material and their properties. It is also worth knowing all the advantages and disadvantages of such structures in order to understand all the consequences of using a material such as polycarbonate. The price, dimensions and some other parameters for certain models are completely different, which should be taken into account.

Sheet thickness and strength
It is very important to choose the right thickness of the material. It depends on what loads the sheet can withstand and to what radius it can be bent. Such information should be sought from the manufacturer or in specialized literature that will help you create a polycarbonate canopy with your own hands, taking into account the specifics of the product.
It must be said right away that we are talking specifically about cellular material, the insides of which consist of specific cells. The fact is that monolithic products of this type are very heavy, although they simply have tremendous strength. Whole sheet 12 mm thick can stop a bullet fired from a pistol.
It is believed that a material of 4 mm is not suitable for creating visors, and products of 10 mm or more can already be used for full-fledged roofs. Therefore, it is worth paying attention to sheets with a thickness of 6 to 8 mm. They are ideal for such work, and their cost is from 250 to 350 rubles per square meter.

Color
AT recent times the question of which polycarbonate is better to choose for a canopy also applies to the color of the material. This is due to various advances in the field of production, which allow the production of these products in various color scheme. There are also models with printed protective coating which blocks the penetration of infrared radiation.
The choice of color is a purely individual matter, but the ability to filter particles or waves of light must be approached very carefully. The fact is that infrared radiation contributes to the heating of the protected surface, which is very important when arranging parking lots for cars. However, if the polycarbonate canopy covers the plants, they will not be able to receive the necessary lighting, which will affect their development.
Preparatory work
Before proceeding with production, it is very important to create quality drawing future design and correctly purchase everything you need. Usually, experts, telling how to make a polycarbonate canopy, recommend using the services of a designer who will also make an estimate. However, with minimal skills, this work can be done independently.

Drawing
- First of all, you need to compare the area to be covered with the dimensions of the sheet. At the same time, they calculate how many pieces of material will be needed, taking into account its location, as well as the angle of inclination or radius.
- On the next step create a drawing of a supporting truss or frame. At the same time, it must be designed in such a way that the jumpers are located at the joints of the sheets. It is also recommended to make original stiffeners that would be placed in the middle of the coverage area.
- Usually, the drawings of polycarbonate canopies contain installation schemes for the building and the floor. At the same time, sometimes it is necessary to create even small foundations and supports. It all depends on the type of building.
Purchase
This stage is very important and requires a separate approach. The fact is that polycarbonate is a very specific material, for which it is necessary to purchase a special fitting and fasteners. In this case, it is very important to take into account the model of the selected material.
If you make a polycarbonate canopy with your own hands, then the easiest way is to come to the market directly with a drawing that you can show to the seller. He will not only select the necessary adapters and special self-tapping screws, but can give advice or suggest changes to the project. However, from the very beginning it is worthwhile to calculate the number necessary elements and their type, which is easier to do using special software.
When purchasing metal for the manufacture of frames, it is recommended to immediately agree that long elements are cut to size. This will help save on transport and relieve performers from additional work.
It should be noted that the cost of profiles for polycarbonate is very different. Ordinary plugs can be purchased for 50-70 rubles, but connecting strips can cost up to 700 rubles.

Step by step installation
When creating a polycarbonate canopy with your own hands, you should adhere to certain plan works. This will save time and avoid mistakes during assembly. At the same time, it is observed correct sequence, which makes it possible to do several stages at the same time.
Base and seats
When making canopies and canopies from polycarbonate, both supports and wall mounting systems are used. Therefore, it is worth considering the manufacturing option using both methods.
- First of all, you need to install the supports. They are made from a profile or ordinary pipe, which is installed in a pit at least 80 cm deep. At the same time, concrete is poured, and the quality is controlled using a plumb line.
- If you plan to install a canopy over the site, then the placement of the supports should be considered in advance. The easiest way is to lay them together with reinforcement and concrete with the base. You can also create special nickels in advance, to which, if desired, metal can be welded.
- The attachment points to the walls must first be cleaned and leveled. The density of the adjoining frame should be maximum. At the same time, it is also worth applying markings to the surface in order to prevent distortions during the installation process.
If it is planned to pour concrete during work, then it is worth remembering that for it to completely solidify, it is necessary to withstand at least a week. At this time, you need to deal with a farm or frame. Especially when you consider that they still need to be primed and painted.

frame
They make trusses or a frame for a canopy from profile pipe, since this material is best suited for polycarbonate. The price, dimensions and methods of fastening of all segments are selected individually. For example, cheaper rods can be used as jumpers, but the base must be very strong in order to not only withstand the weight, but also gusts of wind.
It is believed that it is best to use welding to connect all structural elements. However, some craftsmen prefer bolted fasteners. They are more practical and reliable, but take a lot of time and money to manufacture.
It makes no sense to describe the design itself, since it is made exclusively according to an individual drawing. However, immediately after creation, the product is treated with a primer and painted. It is best to immediately use a special dye composition that can be applied directly to rust.
After the trusses are dry, they must be mounted on supports and fixed to the wall. If the paint was damaged at the same time, then after installation the affected area is additionally treated. The result should be a strong and reliable design that can withstand heavy loads.
sheathing
Usually, the manufacture of polycarbonate canopies does not have difficult steps, but this process should be treated very carefully. Even at the acquisition stage, attention should be paid to the principle of fixing a particular type of material, the type of adapters, connections and plugs used. That's when they pick right tool with fitting.
Most often, the connecting elements are first pre-fixed and the sheet itself is installed in them. It is fixed using special screws that do not violate the tightness of the structure. Then the ends are closed using separate plugs.
Some specialists first prefer to seal the ends of the sheet if, during its fitting, it was cut and internal cavities were opened. This does not reduce the quality of the material and creates an obstacle to the ingress of dust and moisture.
If the sheet needs to be bent, then fix it first from one end, and then along the radius. In this case, be sure to fasten the sheet in the middle so as not to create points of tension. This job is best done by two people to save time.

- The protective film is removed from the sheets only after the material has been fixed. It will prevent accidental mechanical damage in the form of scratches. However, this does not mean that the product can be treated carelessly.
- If polycarbonate canopies are made in the yard, then first you should pay attention to how the shadow behaves during the day, and only after that create a design project. So you can take into account all the moments with the ingress of sunlight under the finished system and take additional measures, if necessary. For example, install additional side sun protection.
- The right color of the material will create the appropriate atmosphere and level of comfort. Therefore, when choosing it, you need to take into account the wishes of all the people who will operate the product.
- It is best to create semicircular structures with a small radius. So snow in winter will not be able to accumulate on the surface, creating additional loads. Also very practical single slope systems, allowing to withdraw rain water in one direction, which is very important when creating canopies over the entrance or places for recreation.
- For correct retraction rainwater, some canopies should be equipped with stormwater drains. However, it is much easier to immediately think this moment when designing to reduce costs and installation time.
- If desired, the frame and supports can be made of wood, but finished construction will have a rougher appearance and a shorter service life. However, when right approach to the design, you can get a real work of art with an original style and high-quality coating.
Conclusion
Given the relative simplicity this montage, we can safely say that even a novice master will cope with this work. However, keep in mind that you will need a specialized tool in the form of a welding machine and a puncher. It is also worth getting a ladder or other structures that allow you to work at height.
Special attention deserves the fact that there is simply a huge number different designs products that differ in shape. In this case, you can always create your own truss system with an original slope or broken corners. Therefore, the final choice of the project depends only on the imagination of the manufacturer and the limiting possibilities of polycarbonate.
Polycarbonate is innovative construction material which has already become quite popular. Per a short time stay on the market, he pressed the film, glass and wood, which were so recently in demand. At first, polycarbonate was used only in the country for the construction of greenhouses and hotbeds due to the fact that it perfectly transmits sunlight, has a good margin of safety and is easy to install. But later landscape designers paid attention to its other advantages.
Why polycarbonate
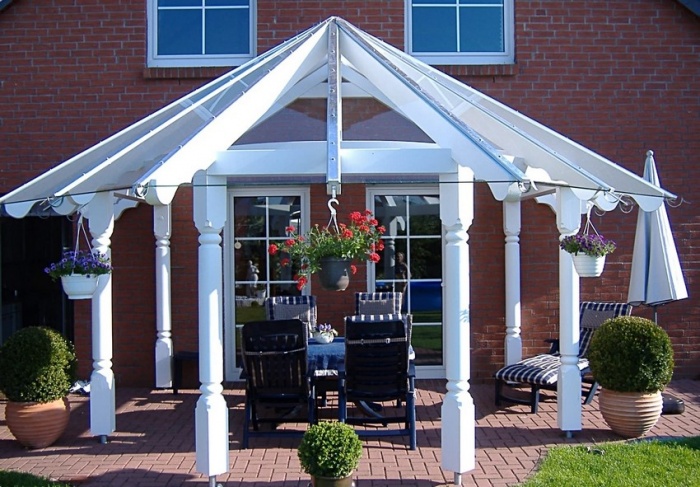
When designing a territory suburban area one of the most pressing issues is the arrangement of a comfortable recreation area that would be located outside the house, somewhere on the lawn, as well as shelters for the car. These problems can be solved in different ways. But the main one is still the construction of the pavilion. A polycarbonate canopy is the easiest to make, besides, it is not necessary to call a master - everything can be made by hand. In addition, this design provides its owner with maximum benefits.
Material types
So far, only two types of polycarbonate are known that are used for the construction of canopies - this is a cellular and monolithic thermoplastic. The first is a panel consisting of several layers of transparent or matte plastic, which are interconnected by vertical stiffeners located along the fibers of the material. At the same time, the voids are filled with air, which gives polycarbonate excellent thermal insulation properties. Cellular sheets bend well even in the usual, so-called cold state. Therefore, a polycarbonate canopy can be made even of the most complex and bizarre shape.
Monolithic polymer has its advantages. It absorbs ultraviolet well and has rich colors, and for all its strength it has a fairly light weight. It is used not only in construction, but also in other industries, which include high-tech systems.

The advantages of this material
A polycarbonate canopy can be of any design, but each of them will have clear advantages that should be mentioned. And the most important thing is the durability of the structure. Also very important is the fact that this material is easy to install and does not require any special care. It provides high transparency or opacity of the structure, depending on the need, and also performs protective functions from the harmful effects of ultraviolet rays.
The material is beautiful and, importantly, it is produced in a wide range of colors. And another very important aspect is a low cost. Canopies made of polycarbonate, the price of which varies depending on the size, will still be cheaper than those made of wood or metal. One sheet of material costs from 1,400 to 10,750 rubles. Such a spread in prices is due to its size and thickness.

How to choose
When deciding which polycarbonate to purchase, you need to decide on three parameters. These are thickness, color and quality. In order to do this correctly, you need to determine the purpose of the building. To select the thickness of the material, the snow and also the crate step are taken into account. A few won't hurt good advice on this occasion:
- four-millimeter sheets are suitable for the device as well as various advertising structures;
- from a plate of 6-8 mm, you can make a partition, a roof, a visor or a canopy to the house from polycarbonate of your chosen color;
- a 10 mm panel is usually used for the construction of vertical surfaces;
- slabs with a thickness of 16 mm or more are suitable for buildings that must withstand truly huge loads, such as car parks.
As for the color, it is also very important nuance, since the coloring of the plates can be of different intensity and transparency. For example, sheets of turquoise, blue and green are suitable for a canopy over the pool. But these tones cannot be used as a visor above the sales counter, because they will distort the original color of the goods placed inside.
The quality of polycarbonate depends only on its manufacturer. Products of well-known companies are always distinguished by reliability and environmental safety, and also have protective layer from exposure to ultraviolet radiation, which is applied to front surface sheet.

Necessary tools and materials
To install a polycarbonate canopy with your own hands, you need to make a calculation and purchase everything necessary for the production of these works. You will need the following materials:
- press washers and anchor bolts(the latter will be useful only when the pavilion will be installed on a hard surface);
- self-tapping screws with galvanized coating;
- a mixture of cement, sand and gravel, if necessary, mount racks for support;
- pipes for the manufacture of support pillars with a square section of 60 x 60, 80 x 80 or 100 x 100 mm;
- cellular boards with a thickness of 8 to 10 mm;
- pipes for lathing with a section of 20 x 40 mm and for runs - 40 x 60 or 60 x 60 mm;
- a supporting arch that you can make yourself, but you must remember that in such structures you need to withstand a ten-degree or greater angle of inclination of the roof.
Tools that will be needed for the production of work: welding machine, screwdriver, circular with discs, electric jigsaw, level and shovel.
Calculations
Very often hosts country houses do not invite masters, but prefer to do almost everything on their own. In order to quickly and beautifully carry out work on the arrangement of the territory, you need to know how to make a polycarbonate canopy yourself.
Before work begins on the installation of such a structure, it is necessary to make its project with drawings. To do this, you need to calculate the size of the frame and the load that it will withstand, taking into account the level of precipitation and typical for your region. Based on this, they select necessary material. A simple drawing of a polycarbonate canopy is presented in this article.

Installation of the structure, the first stage
With the main thing is the marking of the site where it will be located. After that, they dig recesses 0.5-1.5 m long, in which frame racks will be mounted. The depth of the pits depends on the height of the pavilion itself. In them I install the parts to which the frame racks will be attached, pour them with concrete. Next, the soil is removed throughout the canopy to a depth of 10-20 cm, and instead of it, the so-called pillow of sand and gravel is poured, and it is carefully rammed. Then the finishing coating is laid in the form lawn grate, paving slabs or just make a concrete screed.
A polycarbonate yard canopy is usually mounted on a frame made of material that has already been used for other outbuildings to maintain the style of the interior. The basis can be wooden, aluminum or steel blanks.

second phase
The final stage of the installation is the fixing of the sheets. First you need to prepare the panels right size(see the drawing of a polycarbonate canopy). To do this, they are cut with tools. In this work, it is important that after cutting the length of the plate should be 10-15 cm longer than the perimeter of the arch. It is important to know here that after cutting the polycarbonate sheet protective film applied on its front side should not be removed.
Now you need to attach the bottom of the profile to the arch so that its step is equal to the layout of the sheets. Next, fix the panels with self-tapping screws. To do this, drill holes 2 mm smaller than the seat size of the press washer itself. Then screws are screwed, and their hats are hidden under protective caps.
After two adjacent plates are fixed, the docking profiles are closed with a lid. At the very end of the installation, the side parts of the sheets must be protected. This is done by installing end profiles, which are fixed either with self-tapping screws or glued.
A polycarbonate canopy is an excellent solution for a private house. It provides comfort in any weather, even outside the cottage. Moreover, the extension shows itself well in a number of everyday situations that are familiar to every dacha owner.
For example, if you have a polycarbonate canopy in your dacha, then even with heavy rain you will feel warm and comfortable while looking for the keys. Moreover, a similar element in the exterior of a private house allows you to make the design more memorable.
Types of canopies
Engineering science and architecture are constantly evolving. Now erect the strongest structures possible in a few hours. Despite this general principles buildings remained virtually unchanged.
At the moment, there are five types of canopies that are most often used in private homes:

When creating a polycarbonate canopy in a private house, you need to decide on priorities. If you want an exotic look that will immediately catch your eye, then the last two options are ideal.
Advice ! If you have functionality and speed in the first place, then the first and second options are best suited.
What polycarbonate canopies can be made in a private house

Private houses provide a lot of scope for imagination. Moreover, polycarbonate is flexible material, which allows you to create almost any design. In this regard, there are five options for its use:

It is these four options for canopies that are most in demand when it comes to extensions to a private house.
Features of modern awnings
What is the canopy made of?
There are many designs of polycarbonate canopies for a private house, each of which has certain advantages and disadvantages. The choice primarily depends on the specifics of the building and the preferences of the owner. But despite this, the basis of the design always consists of the following elements:
- Supports. It is on them that the roof is attached. The height is set as needed. The material is timber, steel pipes or logs.
- The frame is made of wood or metal; steel or aluminum is most often used as the latter. Can be prefabricated, welded or forged.
- The roof is main element the buildings. It is he who protects inner space from various climatic influences. The coating can be either transparent or matte. The material of manufacture is most often polycarbonate, but exceptions are possible. For example, the use of plastic or roofing material is allowed.
These are the main elements of the canopy of a private house, which you can do yourself. They are not particularly difficult. In addition, their cost is at an acceptable level. The main thing is to calculate everything correctly and draw up a good project.
What functions does the canopy perform

It's worth starting with a decorative function. A polycarbonate canopy is a great addition to a private home. With due imagination, it can become a great design find that will give the building an interesting and unusual look.
The space under a polycarbonate canopy for a private house can be designed depending on your preferences and the purpose of the room. As an example, consider a summer garage.
In order not to build a full-fledged extension or not to free up space inside the house, people choose a polycarbonate canopy in a private house as a temporary parking lot. Moreover, if you close one wall, you can make a stand with tools.
In general, summing up all of the above, we can conclude that a polycarbonate canopy for a private house performs the following functions:
- aesthetic,
- protective
- restorative.
A large polycarbonate canopy allows you to have a great rest on fresh air having dinner or lunch with the family
We make a polycarbonate canopy for a private house
Material selection

Polycarbonate is different. The choice directly depends on the building that you want to build in a private house. Most often in suburban construction use the cellular version.
Cellular polycarbonate for private building consists of several layers of plastic, which ensures its stability. The panels are connected by vertical stiffeners. This material has an attractive appearance. In addition, it is easy to install.
Attention ! The special structure of polycarbonate perfectly protects against harmful UV rays. Therefore, it is extremely often used in private construction.
There are a number of parameters that will help you choose polycarbonate, which is ideal for private construction:
- if the panel thickness is more than 4 mm, then it is perfect option for a greenhouse;
- 6-8 mm - designed for awnings;
- 10 mm - used for the construction of vertical barriers, have high sound insulation;
- 16 - have great strength needed for roofs with a large area.
Wide color palette allows you to choose polycarbonate, which is ideal for creating a canopy in front of a private house. It can also be used to create many other buildings.
Creating a canopy for a private house

It all starts with design. After you decide on the installation site, you can start developing the project. In it you must draw up a drawing, prescribe the right materials and beat the mark.
After designing, the creation of a foundation for a canopy for a private house begins, the operation consists of the following steps:
- Mark the area with stakes.
- Carry out the alignment.
- Dig holes around the entire perimeter of the foundation of the canopy of a private house in increments of a meter. Support posts will be installed in them.
- Install supports and concrete them. Wait a few days.
- Remove the soil inside the area by 15 cm.
- Cover the bottom with a pillow of sand and tamp it down.
- Set up a drainage system.
- Make a formwork for the foundation of a private house,
- Pour concrete mortar and lay the mesh, then apply another layer.
- The formwork is removed after three days. The structure will gain sufficient strength in 3 weeks.
- Lay the tile.
After the foundation for the canopy of a private house is laid, you can begin to build the frame. Support posts are attached to embedded parts. The upper strapping is done by electric welding.
The transverse elements of the frame of a private house are attached to the supporting beams using vertical struts. But this can only be done after top harness through electric welding.

Only now can you start laying polycarbonate for a canopy in a private house. If you are laying sheets up to 8 mm thick, a construction knife can easily handle cutting them. For thicker plates, you will need a circular saw.
Attention ! The protective film can only be removed after installation.
Polycarbonate sheets are fixed with self-tapping screws. This will ensure the strength of the canopy for a private house. The distance between the screws should be 30 cm. It is very important not to overtighten the thermal washers. Otherwise, the polycarbonate will crack.
Results
There are many types of polycarbonate canopies that are used in outbuildings for a private house. Moreover, there are many types of extensions themselves. Moreover, each type has its own purpose.
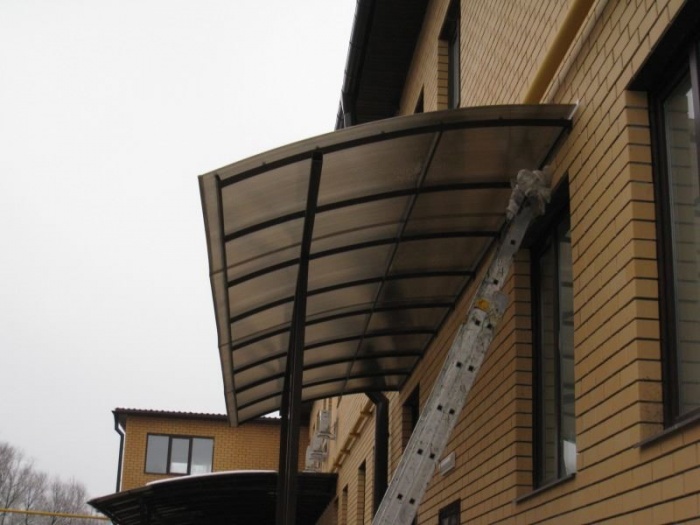
Courtyard of a private residential or country house over time, it acquires outbuildings that simplify the life of the owners, the construction of which, as a rule, takes place with their own hands. Shed canopy with polycarbonate coating - simplest design, which can serve as a gazebo, a place to store firewood, keep a car and other household needs. Polycarbonate gives buildings a modern, attractive look, without requiring financial investments and complex maintenance. This article will tell you how to calculate, execute drawings shed canopy from this inexpensive material.
Polycarbonate is a modern high-tech material based on polymer plastic, which has a cellular structure. This material transmits light, produces colorless, colored and patterned products. will be excellent and a garage attached to the house, or a detached structure. This material has gained popularity due to the following qualities:
Note! Experienced craftsmen note the excellent soundproofing ability of this material, thanks to which even in the strongest downpour the sound of drops does not interfere with the conversation and sounds quiet. Quality polycarbonate has a service life of up to 25 years.
Design
The design of a shed canopy is quite simple for do-it-yourself installation. It consists of supporting pillars, roof trusses, lathing and the actual polycarbonate coating. AT construction stores sell kits for self assembly, however, it is not much more difficult to calculate and make drawings yourself. In the process of creating a project, the following factors are taken into account:


Important! roof trusses a shed canopy is a triangular structure, the base of which is equal to the width of the canopy, and the hypotenuse corresponds to the length of the slope. To protect the polycarbonate sheet from damage and deflection, a crate is constructed, the pitch of which does not exceed 40-50 cm.
Mounting process
Do-it-yourself installation of a shed polycarbonate canopy takes no more than 1 day, it can be done by one worker, however, help in this matter will not hurt. For assembly, you will need a standard set of tools, which includes a welding machine, a screwdriver, a hacksaw or a grinder. The construction process is as follows:


Important! All seams on the frame of the canopy, remaining after welding, are cleaned with their own hands, then primed. Metal parts are coated with a durable paint for additional protection against corrosion. The edges of the carbonate are glued with reinforced tape.
Video instruction
When refining country house it is worth considering every detail so that as a result you have a good place for relax. For example, when organizing a recreation area, it is worth building a canopy. Polycarbonate can be used for this purpose. This material has sufficient strength, so it is worth knowing some details of the manufacture of the building from it. In this article, you can find step-by-step instructions on how to make a polycarbonate canopy. You can also view several drawings that offer options for arranging this design. Therefore, even if you are new to construction, this article will help you get general idea about work, and also try your hand.
For the manufacture of transparent roofs, polycarbonate has proven itself with positive side. Unlike glass and plastic, this material is easy to use. The edges of the product are equipped with stiffeners, so that the sheets can be bent without bad consequences. Therefore, it is possible to construct canopies of any planes, even semicircular ones. Another advantage of the material in a variety of colors. Plus, the transparency of the material enhances the illumination of the closed area.
Sheets with one shade or another muffle Sun rays. So even in the hottest weather it will be safe to be under a polycarbonate canopy.

First of all, it is worth considering the design of the future canopy over the porch or other place. For the manufacture of the project, you will need to think about the following parameters:
- Site measurement and frame calculation.
- Determination of the type of material for the framework. It can be metal or wood.
- Definition with the type of polycarbonate - monolithic or cellular.
- Drawing up drawings.
As for the drawings, at the end of the article, you can see some of the options. For example, you can take some as a basis and add something of your own.

To work with such material, you should have the following set of tools and material at hand:
- frame material - wood or metal;
- galvanized screws;
- polycarbonate;
- docking end profile;
- press washers;
- necessary fasteners;
- sand and cement for mounting frame supports;
- crushed stone;
- paint, respectively, on wood or metal;
- hacksaw;
- screwdriver;
- drill;
- level;
- roulette;
- welding machine in case of assembly of a metal frame.
If all the material / tool is collected, you can proceed to the first preparatory stage. To install the supports, it is necessary to dig a hole up to 600 mm deep. This is in case the canopy is planned to be built large. The support pillars should be located at a distance of 1–1.5 m. Having done this work, the further frame can be attached to the supports.
If the canopy is made small and is planned to be installed above the porch, then, perhaps, supports will not be required. A few anchor fasteners to the wall will suffice.

As mentioned above, the frame can be made both from wood and from metal profile. The choice depends on the required strength of the final product. For example, if a canopy is made for a picnic and recreation, then you can build a frame from a bar. If shelter is required for a car, then it is preferable to make a reliable metal frame. In the latter case, one cannot do without the skills of a welder. If you do not have one, then you will need the help of a qualified welder.

In order to save money, you can purchase a ready-made frame, which is assembled with bolts. Such a design, of course, will not be as strong as a welded frame, but in some cases the only right solution.
So, for the manufacture of such a frame, a metal profile with a section of 60 × 60 mm or 100 × 100 mm is required. The choice of profile depends on the load. For example, for a run, you can select a profile with a smaller section - 40 × 40 or 60 × 60 mm. For the crate and even less, you can use 20 × 20 mm.

Previously concreted racks must first be tied at the top. This will provide the structure with greater rigidity. Additionally, strapping can be done from below and in the middle. If the canopy is over the porch, then some of the supports will be on the wall, and the other on the support pillars (in case the size is large enough).
An arch is constructed for the upper part of the structure. To do bent elements, you will need a pipe bender. So, it will be possible to make an arch from a metal profile. The finished frame is coated with an anti-corrosion compound, and then coated with the desired paint color.

It is worth noting some features of attaching polycarbonate to the frame. For the arch, sheets with a thickness of 8 mm should be purchased. The more the sheet should be bent, the smaller its thickness should be. If the roof of the canopy is straight, then the roofing sheets can be 10 mm thick.
Individual blanks must be cut with a hacksaw or circular saw. But keep in mind when cutting, the length of the sheets should be such that they look out 100–150 mm beyond the edges of the structure. Do not allow the product to vibrate during the cutting process. This may cause cracks in the material.
Some specialists cut polycarbonate directly into protective film. Due to this, there is less risk of damage to the sheet during its preparation.

Moreover, when laying the sheet, do not mix up the side. The side that has the protective film should be directed upwards, as it has UV protection.
To connect the sheets, a docking profile is used. Before tightening the self-tapping screw, pre-drill holes in the polycarbonate. They should be a little larger diameter self-tapping screw. Screws should be screwed through special washers with a rubber gasket. It is also important to organize a small gap at the joints of the sheets. It is enough to leave 3 mm for the expansion of the material when heated. As for the end part of the sheet, it is closed with an end profile.

We present you a brief step by step instructions for the manufacture of a canopy made of polycarbonate over the porch and with support legs based on a wooden frame:
- First, the supports are concreted into the ground.
- All wooden blanks must be treated with an anti-corrosion compound. Especially those that will be concreted.
- Attach brackets to the wall of the house, which will support two 120 × 60 mm cross beams. For greater reliability, a beam can be fixed horizontally to the wall.
- Now you need to install the cross beams on the racks and on the supports fixed to the wall.
- In the place where the cross beam connects to the rack, use metal corners.
- Next, you need to build a crate.
- When the frame is ready, it is necessary to fasten the polycarbonate with self-tapping screws with thermal washers.

This simple instruction confirms the words said at the beginning of this article. Even without special building skills, you can, if you wish, do all the work of making a canopy yourself. if you have personal experience in such construction, then leave your comments at the end of this article.
Video
A photo
Several variations of polycarbonate canopies:


Scheme
The provided schemes will help you choose the project option that suits your case: