Installation of a self-leveling floor on a wooden base. Self-leveling floors and a wooden base How to fill a wooden floor with self-leveling floor
Quite often, when repairing, systems of self-leveling floors are used recently, which are distinguished by durability, wear resistance and strength. Among their positive qualities are safety and environmental friendliness. Since the creation of such coatings, there have been major technical changes. For example, they are presented in a wide color scheme, which is especially true. With their help, you can create real masterpieces of design.
Can wood be used as a base?
Quite often, masters ask the question of whether it is possible to equip a self-leveling floor on a wooden floor. The answer is yes, but before laying such a coating, it is necessary to analyze the rough base, and also determine whether it requires preparation. Realize installation work on wood is necessary only if it is well preserved, and it is recommended to use a thin-poured mixture for arranging a finished surface, which will not be able to increase the height significantly.
Preparatory work

Bulk can be equipped not only according to the variety described above draft foundation but also for concrete. Before pouring, any surface has to be prepared, the first step is to remove the baseboards and remove the fasteners from the walls. Then the master carries out the scraping of the surface, for this you should use the appropriate equipment. If the room has a small area, then it will be possible to cope with the help of a manual cycle. The next step is to hide the cracks using a cipher machine. Such errors during operation in any case appear on wood flooring. The resulting irregularities and cracks are treated with putty, which, after application, is left to dry completely. Then the surface should be sanded with coarse sandpaper, which will improve the quality of adhesion.

The self-leveling floor on a wooden floor will last a long time if the base is cleaned of dust after sanding. It is most effective to use for this. Before priming, the base is degreased. The primer is necessary to increase the adhesion strength of the material to the wood. The application of the composition is carried out in two layers, before carrying out work, sifted quartz sand. This will ensure the most reliable adhesion between the polymer coating and the base.
Instrument preparation
If you wondered whether self-leveling floors can be applied to a wooden floor, then the answer will be unequivocal. Such work is carried out today quite often. It is important to properly prepare the surface and take care of the availability of the appropriate tool. To dismantle the skirting boards, you will need wooden wedges, a nail puller and a chisel, but for wood processing, you need to prepare a sanding machine and a grinding device. You can finally prepare the surface with coarse-grained sandpaper; an industrial vacuum cleaner will allow you to clean the base. To apply the primer to the surface, you will need a brush or roller. Quite often, these tools are used in tandem, since not all hard-to-reach places can be processed with a roller. Distribute most effectively with a short-haired roller and a flat brush. The master will need a spatula and doctor blade. It will be possible to knead the solution for arranging the self-leveling floor with a construction mixer or a drill. Self-leveling floor wooden base it is best to pour in special clothing, wearing goggles, a respirator and gloves. To move on the surface, you will need special soles with spikes. This will allow the master to move around the freshly laid layer.
Work technology

Laying a polymer floor on a wooden floor is no different from the procedure, which involves the use of concrete as a base. Only differs preparatory stage, which was discussed in more detail above. Before pouring the self-leveling floor, prepare the solution using the instructions. The dry mixture must be mixed with water until a homogeneous mass is formed. The resulting solution is laid out on the base, while it is necessary to move from the far corner of the room.
The self-leveling floor is poured onto the wooden floor, then leveled with a spatula until the required layer thickness is reached. If we are talking about a wooden coating, then the thickness should be five millimeters or more. As the best and handy tool a needle roller acts to level and fight bubbles. The intervals between pouring batches should not be more than 10 minutes, otherwise the joints will be clearly visible. But even at the same time, the connection of the mortar strips must be carefully rolled with a roller. As soon as the filling is completed, the hardening surface should be covered with a film, this must be done 15 minutes after completion of the work. This will prevent dust from settling. After applying the base layer and its hardening, you can start applying finish coat, in its role can be a varnish or polymer.
The cost of work for specialists

A self-leveling floor on a wooden floor will hold quite firmly if you follow the instructions provided. This process can be called quite simple, and you can carry it out yourself. But if financial possibilities allow, it is recommended to hire a team of specialists who guarantee high quality workmanship, carry out installation according to technology, and also give a guarantee for the work done. As a rule, specialists use expensive construction tools. All this adds up to the cost of preparatory, priming work and manipulations for pouring the mixture. For one square meter preparing a wooden base will have to pay 400 rubles, while applying a primer costs 200 rubles. per one square meter. Specialists fill the surface with quick-drying bulk compositions for 400 rubles. per one square meter.

If you want to make repairs in a residential area, it is recommended to choose mixtures based on polymer resins. If there are places of high humidity, then epoxy filler should be used in them, while polyurethane flooring is suitable for the rest of the house. If you are thinking about the question of whether it is possible to pour a self-leveling floor, a wooden floor can be an excellent base. If there is a plank coating, it should be repaired, the peeled floorboards should be replaced. Fasteners are tightened, gaps are filled with sealant or the latter is mixed with an equal volume of sawdust. Waterproofing should be laid on a wooden base. Do not neglect the need to apply a primer, two layers of which will facilitate the main work and increase the strength of the coating.
Secrets of using finishing mixes
The self-leveling floor on a wooden floor will look very good if the draft base does not have rough relief flaws. It is desirable to exclude them, since the thickness of the laid layer does not exceed 5 millimeters. Even if bumps and depressions can be smoothed out by a leveling compound, there is a strong argument in favor of eliminating defects. Self-leveling floors will harden unevenly, while the strength indicator will vary.
It is also important to choose the right dry composition, the ingredients based on which will determine the purpose of the future floor. For example, if the mixture contains cement as a binder, then this composition is suitable for pouring floors in bathrooms, kitchens, showers and bathrooms. If we are talking about mixtures with gypsum in the composition, then such a floor is best used for rooms with dry and low humidity levels, it will demonstrate all its positive traits bulk floor. A wooden surface can also be used for a base in which a heating system will be present. In this case, you should choose a leveling mass that has increased elasticity. It will expand and contract during operation without cracking.
Conclusion
Sometimes the self-leveling floor is separated from wooden surface oiled paper, which is covered with an overlap. In this case, the layer should be poured with a thickness of one or two centimeters. The boundary between the screed and the self-leveling floor should be formed by surface treatment with waterproofing impregnation.
All photos from the article
In what cases should you prefer a self-leveling floor on a wooden base? How to properly prepare the boardwalk under it? How to mix and pour the mixture? Finally, what can replace the solution we are discussing? Let's try to figure it out.

It is believed that self-leveling compounds are only suitable for concrete substrates. Whether this is so, we have to find out.
Why is it needed
In some rooms with high level humidity, a typical floor covering is traditionally tile. It is mechanically strong, easily cleaned of any contaminants, has an almost unlimited service life and equally unlimited water resistance.

A tiled floor is a great solution for a kitchen.
However, laying tiles on a plank base is, to put it mildly, problematic:
- Deformation of the boards will inevitably lead to the fact that the tile will move away from the adhesive layer.
- Under significant loads, the deflection of the boards can cause the tile to crack.
Obviously, under the tile, a stable base that is not prone to deformation is needed. A reinforced screed suggests itself for this role; however, the load created by it with a thickness of at least 5 centimeters is already about 150 kg / m2, which is excessive for wooden lag and boards.
In addition: the tile screed must be aligned with the beacons.
This is a rather lengthy and laborious process.
But the relatively thin and durable self-leveling floor in wooden house quite capable of solving our problem: with a thickness of 0.5 - 3 centimeters, it will create a very moderate load on the plank floor and at the same time prevent its deflection under load (of course, taking into account the distribution of the load on the tile laid on top).
Restrictions
They flow directly from the structure of the pie we are creating.
- Legs should not bend. Rot and dust are strictly prohibited.

- The thickness of the floor boards must completely exclude deformation in the entire range of design loads. Yes, the self-leveling floor layer has a fairly significant rigidity; however, its own weight cannot be discounted either.
- Boards should be tightly fitted to each other. The gaps between the floorboards are sealed as tightly as possible with wood putty. In case of serious defects, the floor is simply re-layed with the adjustment of the floorboards.
Please note: strictly speaking, it would be more correct to remove a section of wooden flooring along with logs, build formwork around the perimeter and pour a conventional reinforced screed under the tile.
The design we are discussing will be a compromise between strength and durability on the one hand and minimal cost time and money on the other.
Technology
Material selection
What should be the self-leveling floor for wooden bases? In the store you need to look for a polymer concrete mixture, the description of which mentions the possibility of pouring not only on concrete or cement screed but also on more complex surfaces.

Let's get acquainted with a couple of compositions from this category.
| Name | List of compatible bases | Price |
| GLIMS-S-Base | Any surface cleared of debris | 438 rub/20 kg |
| Knauf Tribon | Cement-sand surfaces, kraft paper, wood | 224 rub/20 kg |
The approximate consumption of the dry mixture is 16 - 18 kg / 1 m2 with a layer thickness of 10 millimeters.
Floor preparation
We have already mentioned some of the stages: logs and flooring need to be strengthened, if necessary, completely or partially re-layed.
How to close individual gaps?
- The largest holes between the floorboards are clogged with wooden wedge-shaped inserts.

- Minor defects in the base are sealed with acrylic putty on wood, a home-made putty mixture of sawdust and PVA glue, or ... an ordinary sand-cement mixture.
In addition, two more important stages of preparation are necessary:
- For better adhesion, you need to remove from the boards paintwork . This can be done with a scraper (after all the nails have been sunk with a finisher) or with an ordinary spatula - after pre-applying a wash or warming up the paint with a building hair dryer.
Attention: in any case, work is carried out under open windows or in a respirator.
Breathing in small sawdust, fumes from a wash or heated paint is equally harmful.
- Cleaned boards are treated with antiseptic primer at least twice. For obvious reasons, we are not interested in rotting wood under a massive slab of poured mixture and tiles.

fill
So what is the right way to pour self-leveling floor on a wooden floor?
Like that:
- With water or laser level determine the highest point of the flooring.
- We put there any beacon that marks the minimum required coating thickness. It has its own for each mixture; as a rule, manufacturers recommend a minimum thickness in the range of 6 to 10 mm.
- We mix the dry mixture with water using a construction mixer or an appropriate nozzle for a drill / hammer. The manufacturer's instructions for the ratio of water and mixture must be strictly followed. With deviations, we will get either a drop in strength, or a seizure up to uniform distribution on the surface of the base.
- The composition is distributed over the surface of the floor and rolled with a spiked roller. This operation will speed up the spreading and help get rid of air bubbles. The floor level, as you might guess, should be aligned with a pre-installed beacon.

Further work continues after the coating has gained strength within the time specified by the manufacturer.
Alternatives
Are there any alternatives to the described solution?
Yes, and the implementation of most of them is much cheaper. Let's give a couple of examples.
Plywood and linoleum
If the main goal of laying tiles on a self-leveling floor is to organize high-quality waterproofing in the kitchen, you should think about replacing this design with linoleum laid on a base previously leveled with plywood. The durability of the coating will be somewhat lower; on the other hand, we will significantly reduce costs and reduce the duration of repairs: we will not have to wait for the self-levelling compound and tile adhesive to set.

DSP for wood
Another "lazy" way of laying tiles on a wooden base, the author realized with his own hands.
It consists in mounting on top of the cement flooring - particle board 24 mm thick.
- DSPs are cut out according to the size of the room. expansion joints not needed: the material practically does not change linear dimensions with fluctuations in humidity and temperature.
- Holes for self-tapping screws are drilled and countersunk in the plates.
- On a base cleared of debris, it is dotted polyurethane foam. It will perform the function of glue and prevent the slightest.
- DSP is screwed with self-tapping screws and primed under tile adhesive.

Conclusion
We sincerely hope that a few of the solutions we have given will make it easier for the reader to solve numerous repair problems. The video in this article will offer him additional thematic information. Good luck!
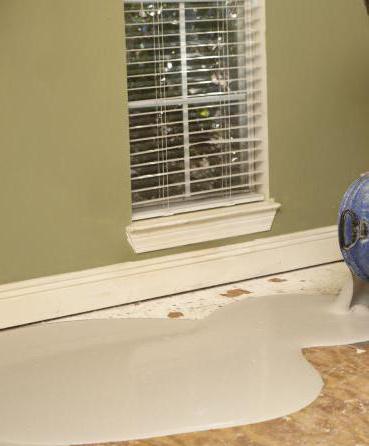
At first glance, the situation is rather complicated when a relatively fragile leveling layer needs to be poured onto such an unstable base. However, there are many proven technologies that will allow you to do the installation even with your own hands.
Need to repair wooden floors in the apartment and want to use self-leveling floor? The option is not the easiest, but there are proven technologies that are easy to do even with your own hands.
Attention! !
What is the complexity of installation
If a concrete screed is used as a rough base, we can do the job without problems, this base is very strong, stable. For a successful result, it is necessary to prime, set beacons. A more difficult case is when the wooden floor is in the apartment. 
The boards do not form a single plane; they dangle with poor-quality installation. With fluctuations in humidity and temperature, the geometric dimensions change, and individual boards with different sizes are especially important with a warm floor. When drying out, cracks appear, they will have to be sealed, then the leveling solution will not flow into them. During operation, squeaks will appear, without dismantling with repeated work, it will not get rid of it.
Wood floors are prone to rot. When installing a self-leveling floor, it will be necessary to provide conditions in order to exclude debate, the destruction of wooden elements. It is also impossible to overdry it - the tree loses its strength, cracks.
We will do it with our own hands, we will try to get by with the most accessible tools.

List of tools:
- Screwdriver;
- Drill with mixer nozzle;
- Level;
- Electroplaner;
- Roulette;
- Scissors.
- Spatulas wide
- Spatula narrow
- Tanks for clean water
- Solution container
- Needle roller
Preparatory work
We strengthen, level the old wooden floor.
What defects have wooden floors in the apartment
- Boards of various thicknesses
- Boards led by a "screw"
- Dry or laid with a large gap wooden elements constructions;
- The presence of a creak
- Decayed floorboards, beams
- Old peeling paint
- Level deviation
We examine the wooden floor. Is there at least one defect? Let's start fixing it. Defects occur in most cases, with the exception of new wooden floors laid in accordance with all the rules.
Checking the level of wood flooring. If the plane does not match the level, you will have to completely open the floors and level or even change the logs. It would be nice to open a small part, even if the level is within the normal range, to check the integrity of the lag, but this applies more to older designs. 
Let's say we found a bias. Then it is easier to disassemble the completely wooden floors and mount them on a new one. We start the installation from the extreme logs located at opposite ends of the room. We install them exactly, according to the level, and then we stretch the cord between them. Intermediate lags are installed along the cord. Those that are above the cord, we process with a planer, and under those below, we put pieces of plywood or another suitable material. In the apartment high humidity? It is necessary to treat the material with antiseptic agents.
When the logs are laid in one plane and fixed, we begin to check the thickness of the boards. It happens that the gaps between the floorboards are 5 mm or more, then it is necessary to correct the situation, despite the fact that a leveling mixture is poured on top. It’s the same here, we remove the required thickness from thick floorboards with an electric planer, and we use linings for thin ones.
A more complex defect in the form of boards that are twisted with a “screw”. Wedges with a planer will not help. The floorboard “screw” rests on the beams with only one edge, if you chop off the protruding edge, the second edge dangles in the air, and this is not reliable. There are two options here - to change the entire floorboard or try to straighten it by pulling. It is not possible to attract with ordinary self-tapping screws, the slots are torn off or the bit is damaged, and there is not enough effort.
In this case, a long screw (at least 100mm) with a hex head can help. To attract with such a screw, we will make a hole in the board, in the place where it protrudes upwards, do not drill closer than 2 centimeters from the edge. The hole needs to be slightly larger than the thickness of the screw. We wrap the screw until the edge of the floorboard is even with the plane of the adjacent boards. Then we fix the attracted place with at least four wood screws, turn out a large screw.
Another common defect big gaps. If we were preparing the floor for laying laminate, the gaps would not be so critical, a couple of layers of plywood would save the situation. But we also need to fill in the liquid solution of the self-leveling floor on the wooden floor in the apartment, and it will definitely leak into the cracks. You can remove large gaps with store putties on wood, only if you go to the store, then choose acrylic for seams and sealing cracks, there are also finishing ones, they will not suit us. You can make such a putty yourself by mixing PVA glue with small sawdust.
If the wooden floor in the apartment is painted with paint and it has begun to peel off, you will have to rip it off. During operation, it, along with a layer of self-leveling floor, can move away. I won’t write about rotten floorboards and creaking. We change necessary elements and strengthen.
Preparation for pouring
We got a relatively flat and strong surface. Treat with an antiseptic internal works. We cover with a primer in two or more layers, as the wood is highly absorbent. Before priming, we clean everything from dust and sawdust. Deep penetration primer. 
You will need a deformation damper between the screed and the wall. O is needed to protect against temperature deformations, especially if a warm floor is planned. The walls will not break, but the cracks on the surface will go. As such a layer, either a special self-adhesive tape is used, and strips cut from isolon. We fasten them vertically around the entire perimeter of the room.
fill
Perhaps you have already chosen, for example, gypsum, polyurethane or cement. But I would recommend using the special composition Vetonit 4310 from Weber. It is designed specifically for complex bases, including deformable ones, like a wooden floor, although its base is cement. It can be used as an independent base layer, thickness up to 60mm is allowed, as well as an intermediate layer between wood and other types of self-leveling mortar. 
It is time to pour the self-leveling floor onto the wooden floor, this process is done together. One person kneads the composition, and the other pours it out, leveling it with a wide spatula. At large areas, you first need to make beacons from screwed screws or spider beacons. After leveling, it is necessary to remove air from the layer; a needle roller is used for this purpose. You need to have time to do everything no longer than 20 minutes, then it will begin to set.
The final coating is laid in 1-3 weeks. To speed up drying, you can not arrange drafts in the apartment, this will lead to uneven drying, the appearance of shrinkage cracks. To check the final drying, a vapor barrier film measuring a meter by a meter is needed. Lay the film on the screed, the formation of condensate under the film means that the drying process has not ended.
If needed heated
Now underfloor heating has become popular in private houses and apartments. Heating systems are divided into water and electric. In the case of a tree, it is better to choose an electric one, you can also do a water one, but you need to be sure that the floors will withstand a high load. For the water version, a screed with a thickness of at least 50 mm is usually needed, and this is already a lot of weight. The pipe has a height of 16mm, a solution of 30mm is poured above the pipe, for even heat distribution. 
In this case, a prefabricated lightweight system with aluminum plates or a multi-layer underfloor heating system made of gvl sheets(drywall), you can read more about this technology here. But this is a slightly different topic.
So it's still better to use the electric option. The technology is not much different from laying on concrete screed. You already know how to make a base layer on a wooden floor, then a rolled foil insulation with reflective properties is laid on it. After it, we mount the reinforcing mesh, and already roll it on top heating elements and fill them with a self-leveling leveling agent, a DSP is also suitable, it is cheaper.
Nobody canceled the intervals for curing, when installing a heated floor - we wait 3 weeks. It is necessary to turn on the heating no earlier than a week after installation. Tile is suitable as a finishing coating. Laminate flooring can be laid with an underlay.
Video
Advantages of bulk coating
Self-leveling floor is a technological way of repair in old apartments. Lets in short time receive flat surface. Eco-friendly, durable. Easy to make by hand. It is plastic, steady against cracks on the difficult wooden bases.
Valued for their quality and high wear resistance. This is a durable coating that can really not only make the floor even, but also beautiful. But for such floors to serve long years and looked really presentable, it is important to fill them correctly. At the same time, one of important aspects pouring process is proper preparation grounds. It is interesting that you can make a self-leveling floor on a wooden base, and not just on a solid concrete one. What installation features are important to consider in this case?
Self-leveling floors are made from special polymer mixtures, which, when solidified, are able to become durable, neat and flat ground if the installation has been done correctly. The composition of the mixtures used to create them can be cement, gypsum, various fillers, as well as a number of modifying additives that give the floor certain properties- for example, strength, ability to resist impacts, the rate of setting of the mixture, etc.

They are valued for the following:
- high level of wear resistance;
- big choice color solutions;
- environmental friendliness;
- excellent moisture-proof properties;
- antistatic;
- durability;
- seamlessness - you can pour floors of this type throughout the apartment without a single joint;
- resistance to a number of mechanical influences, as well as to the effects of almost all existing chemicals.

It is necessary to pour self-leveling floors on a properly prepared base. And many doubt whether they can be equipped on top. It turns out you can. It is only important to properly prepare such a foundation. It is also important to choose the right type of mixture for pouring.

Table. Types of mixtures for filling.
| Mix type | Characteristic |
|---|---|
| Epoxy | From such a mixture, good floors are obtained that are not at all afraid of the effects of water. They are usually settled in rooms where the level of humidity is high. Such a floor can be poured onto a wooden base. |
| Polyurethane | One of the most durable floors with respect to serious long-term impacts. Great for arranging in areas with high traffic. |
| Methyl methacrylate | This mix is intended for creation of the bases in the rooms which do not have heating. Perfect for those where winter time there is no heating. |
| Epoxy urethane | Durable floors that are highly resistant to a wide range of influences. Alternative option polyurethane floor. |

On a note! Compounds for pouring floors can be either two-component or one-component. In the first case, floors with a beautiful pattern can be created, and mixtures of the second type are used to create a base for other materials such as tiles, stone, etc.

Prices for self-leveling floors "Prospectors"
self-leveling floors miners
The choice of mixture for pouring
Usually, on each package with a mixture for the manufacture of a bulk base, its purpose is indicated. That is, for example, some are suitable for creating floors on concrete base, others can be used on wood. Most often, mixtures containing gypsum and cement are excellent for these purposes.

Important! Do not confuse mixtures for pouring the floor with compounds designed to level the surface. Such compositions are poured in a thin layer of only a few millimeters. To fill the floor wooden base the thickness of the poured layer should be greater.
To choose the right mixture for pouring a wood floor, it is important to carefully study the instructions.

What will be needed?
To make a self-leveling floor yourself, you may need certain tools. The list of what you need to buy or rent includes:
- directly the mixture itself;
- wide spatula equipped with a long handle;
- construction mixer or conventional drill with a special nozzle;
- needle roller, which is used to remove air bubbles from the filled mixture;

- building level of any type - necessary to assess the final result;
- polishing tools ( Sander, sandpaper etc.);
- waterproofing materials (at least a dense polyethylene film);
- construction vacuum cleaner;

- hammer, nails, nail puller;
- sealing mixture, with which it will be possible to eliminate the gaps between the floor boards or plywood sheets. Can be replaced with spatula.
The 21st century is the time that made the self-leveling floor on a wooden base so popular and in demand both in residential premises and in modern offices. Today, self-leveling floors on a wooden floor are not just a coating, but also an excellent decorative solution, especially if 3D imaging technology is being shared. Such floor coverings have many advantages and worthy performance characteristics, as well as quite democratic cost. Few people know how to make a self-leveling floor on a wooden floor with their own hands, but this is not as difficult as it might seem at first. This guide will help you make a self-leveling floor on the boards.
What are self-leveling floors on a wooden base?
A self-leveling floor on a wooden base is not one solution, but a whole category of materials that are applied to a concrete or wooden (as in this case) base. Self-leveling floor wooden floor can be divided into:
- Polyurethane. Durable and resistant to long-term impacts, a polymer floor that is the best suited for arranging floor covering in places with a lot of people.
- Epoxy. This is a self-leveling floor on a wooden floor that does not react to moisture in any way. Such floors are recommended to be installed in wet rooms especially in the bathroom and kitchen.
- Epoxy urethane. A type of polymer floor that has good performance strength and wear resistance. Can be used as an alternative to polyurethane coating.
- Methyl methacrylate. Polymer floor with excellent thermal insulation properties, often used for arranging floors in rooms without heating or with poor heating in the cold season.
Do-it-yourself self-leveling floor on a wooden floor can be one-component and two-component. The first type is often used as the basis for installing parquet, stone, tile or other decorative coating. Two-component coatings often contain a three-dimensional image that gives the floor a creative and unusual appearance. Next, we will figure out whether it is possible to make a 3D floor on a wooden floor and how to do it.
The main advantages of self-leveling floors on a wooden base
Filling floor on a wooden floor is a solution that has received its demand not only due to its appearance, but also because of its good specifications and numerous benefits. They can be found below:
- High resistance to prolonged mechanical stress, wear and abrasion resistance.
- Excellent resistance to chemicals - a self-leveling floor under a tree will withstand even acids.
- A wide range of available colors, design styles, patterns and textures, images.
- Excellent sound and heat insulation performance - the creative self-leveling wooden floor is quiet and warm!
- High strength, reliability, long service life of the coating, which will last for decades.
- The presence of antistatic properties, thanks to which the self-leveling wooden floor is quite easy to clean.
- Absolute seamlessness - this facilitates the process of floor maintenance, prevents squeaks of the coating.
It can be seen that the self-leveling floor in a wooden house is not only a modern and beautiful, but also a practical solution that can delight the inhabitants of the home for many years. In addition, such coverage can be equipped on their own. We will learn how to fill a wooden floor with self-leveling floor, what tools and building materials are needed for this.
What tools are needed for arranging the floor?
Do-it-yourself self-leveling floor for wooden bases requires the use of a wide range of tools, fixtures and materials that must be prepared before starting work. You should definitely have on hand:
- A special mixture for a self-leveling floor is the basis of a future floor covering.
- Long spatula, needle roller (required to remove air bubbles).
- Construction mixer or drill with a special nozzle, if there is no mixer.
- Laser or ordinary building level, aluminum rule.
- A container of at least 20 liters, a set of construction beacons and wooden blocks.
- Alabaster, mortar, water in sufficient quantity for the mixture.
- Triangular scraper, screwdriver, self-tapping screws, dowels, long ruler.
Also, special clothing will not interfere - protective gloves, a mask for the eyes and face, as well as shoes designed for walking on painted surfaces (paint shoes). After preparing the necessary arsenal, you can begin.
Preparing the base for the polymer floor
Is it possible to pour self-leveling floors on a wooden floor? Yes, sometimes masters do not wonder if it is possible to make a self-leveling floor on a wooden floor and apply the solution directly to the old coating. However, even with this, it is necessary to carefully prepare the base of wood - it should be sanded well so that the surface becomes rough. This will greatly improve the adhesion of the floor to the layers. polymer coating. It is also worth taking care that there are no traces of grease, dirt, oil and other contaminants on the wooden surface of the floor - they are removed with a solvent.
Is it possible to make a self-leveling floor on a wooden floor if it creaks? No - otherwise the final coating will lie unevenly and cause a lot of problems. To avoid trouble, you also need to check the floor. All boards must be securely fastened in the correct position, the floor itself must be even, without bumps and defects. Also, before applying the polymer floor, it will be necessary to remove all paint from the surface of the base, if any.
Before you make self-leveling floors in a wooden house, you need to do a little preparation of the coating:
- Remove all skirting boards and close the holes formed after the removal of the skirting boards.
- Seal all cracks, chips and irregularities in the floor surface with mortar.
Now you can proceed to actions that will eventually lead you to the completion of the arrangement of the self-leveling floor.
We level the surface and put beacons for the floor
In order for the floor to be as even as possible, you need to take care of this even at the initial stages. So, before pouring the solution, draw a line along the entire length of the room, then set self-tapping screws along it, the distance between which is 30 centimeters. Using a laser building level, you will need to detect highest point located on a wooden base for a polymer floor. After detection, it is necessary to add about 5-6 mm (thickness of the floor layer) and align the screws at the same level. It is still too early to make 3D floors on a wooden floor.
The next stage, which continues the installation of a self-leveling floor on a wooden floor, is the placement of beacons. They must be placed on previously installed screws, securely fastened with mortar. After that, you should prepare a solution for the self-leveling floor - for this, the contents of the package must be mixed in a container with water in accordance with the instructions indicated on the package, and then stirred until smooth with a construction mixer.
We start pouring the solution for the self-leveling floor on the tree
We already know whether it is possible to use self-leveling floor on a wooden base. The solution prepared in advance should be carefully poured onto the prepared base, covering an area of \u200b\u200babout 2 square meters at a time. meters. The layer must be aligned with the beacons using long spatula. When the formation of the layer is completed, it will be necessary to use a spiked roller to remove all air bubbles on the surface of the coating - this is very milestone, on which the further fate of the entire result depends. Wait until the floor is completely dry.
Now you know how to make a self-leveling floor on a wooden floor - video instructions on the Internet will help you see how the process looks visually, which will give you a better understanding of the essence of the technology. Equipped coating can be used as a basis for application decorative materials, or leave as an independent floor.