How to hang a chandelier: installation and connection to the mains. How to hang a chandelier on a concrete ceiling Connecting a chandelier to a pendant
Connecting a ceiling chandelier can be done in two main ways:
- through the switch (two, three-gang)
- via dimmer
And in one and in the other case, you get the most important thing from the lamp. Either the chandelier shines at maximum brightness using all the bulbs, or the lamp works with partial output, creating a pleasant illumination that does not hit the eyes.
Let's consider these methods step by step, starting from connecting the cable in the switchboard, and ending with connecting the wires in the chandelier itself. Special attention will be drawn to the most common mistakes in the performance of these works.
How to connect a chandelier through a double switch
 In order to make this connection, purchase the following materials:


First of all, take a three-core cable VVGnG-Ls 3 * 1.5mm2 and stretch it along the gate to the nearest junction box near the chandelier. 
Leave a margin in it for cutting and connecting the ends.
In the electrical panel, remove the insulation from the cable and connect the phase conductor (let it conditionally be white color) to a single-pole machine. 
Run the yellow-green and blue wires to the appropriate places (grounding and zero busbars). 
It is advisable to mark the stripped cable in the junction box so as not to confuse anything in the future. 
- L - phase
- N - zero
- PE - earth
Now, with another 3-core cable from the junction box under the ceiling, to mounting box below, where you will have a two-gang switch, you need to make a descent.
You immediately clean the veins and sign: 
- L - power phase
- L1 - phase to the first group of lamps in the chandelier
- L2 - phase to the second group of lamps in the chandelier
You need to sign them both on the switch below and in the top box. 
Peel off the insulation from both ends and mark: 
- L1 - phase wire for connecting the first half of the chandelier
- L2 - phase wire for connecting the second half of the chandelier
- N - zero
- PE - earth
Now the most basic. It is necessary to correctly assemble all this and connect it together in the upper junction box. 
In order not to confuse and not make mistakes, the inscriptions made earlier will come in handy. With them, all switching is much simpler.
Take the Wago terminals and simply join the cores with the same marking. 
Then the box can be closed.
Connect the main power conductor L to the common terminal of the switch 1. 
Usually it is separate, but not all manufacturers have such a design. Be careful! 
L1 and L2 are connected to the lower terminals 3.4. 
You mount protective and decorative strips and again rise up to the chandelier. 
Here the question may arise, but how to find out which wires sticking out of the chandelier are phase and which are zero?
Especially if they are the same color. There can be 3,4,5 of them, depending on the type of lamp and the number of its horns. 
This is where a multimeter comes in handy. You need to call the wires below, when the chandelier is not yet suspended from the ceiling.
Zero, according to the rules, should come to the threaded part of the cartridge and the light bulb (extreme contacts), and the phase to the central contact pin. 
Switch the multimeter to the continuity or resistance measurement mode, and sequentially touch the wires and contact parts of the cartridges on each cover with the probes. Need to achieve sound signal or find where the resistance is zero. 
If there are several zero cores, twist them into one common one.
Go to direct connection. To facilitate the sequence, first connect the protective earth and the neutral conductor. To do this, use the connecting sleeves. 
Although Vago terminals can also be used here.
After connecting the ground and zero, it remains to power two phases. Choose any of the cores and press the supply wires L1 and L2 with two phase wires on the lamp with sleeves. 
All that remains is to fix the chandelier on the ceiling and check its performance.
How to connect a chandelier through a dimmer
 Required material for installation:
- two-core cable VVGnG-Ls 2*1.5mm2
- three-core cable VVGnG-Ls 3*1.5mm2

- lamp


The initial stage for installing a 3-core power cable from the shield to the switch box is the same as in the previously considered option. The connection in the shield, again, is carried out to a single-pole machine. 
The difference lies in the fact that not a three-core, but a two-core cable is now going down to the installation site of the dimmer. You need to mark it as follows: 
- L - phase wire from the switchboard
- Chandelier - phase wire for connecting the chandelier itself
Put three inscriptions on its cores in the places of stripping the insulation: 
- Chandelier (feeding phase)
- zero
- Earth
After that, in the box with the help of Vago clamps, you switch the cores according to all the inscriptions. 
Connect the same marked cores to each other. 
Go to the dimmer from below. The main power phase, which comes from the electrical panel (previously you signed it as L), is connected to the dimmer terminal labeled "L" or "phase". 
Another core signed "Chandelier" is clamped under the screw with the dimmable load icon. 
On the chandelier, connect the phase conductor signed “Chandelier” through a pressed sleeve to the supply wire of the lamp. 
If you have several phase conductors coming out of the lamp (two, three, four carob chandeliers), then to connect the load through a dimmer, simply twist them into one common conductor. 
It remains to connect zero and ground, apply voltage and check the operation of the entire structure.
Common connection errors
The main errors are related to connecting to double switch. Three of them are the most common.
How does a normal chandelier connection scheme, for example, two or three arms, work? There is a phase that comes into the junction box. 
In this case, zero comes only to the box and immediately goes to the chandelier, without going down to the switch. 
This is where the first mistake lies. Many, unknowingly or having confused the markings, lower both the phase and zero down to the switch.
They lead to the terminals, after which they begin to turn on the key, and the machine knocks out from them.
Remember, zero should never enter the switch, but only phase. The zero core should immediately go to the ceiling.
The second error is again related to zero. Having mixed up the two wires, you can start zero through the switch, and not the phase. 
It may even work for you, everything will work properly, but the voltage will be constantly present on the lamp. This is fraught with electric shock when you want to change light bulbs.
By turning off the key, you will break the zero core, and the phase will still go directly to the carob cartridges of the chandelier.
What else is dangerous such a connection? Through the filaments of the light bulb, the phase will come to the terminal clamps of the switch itself. If you remove the cover from it and start checking the glow on the contacts with an indicator screwdriver, you will be very surprised. 
Even when the keys are off, the indicator will glow and show the presence of voltage, both on one and on the other terminal.
Moreover, if you make a similar measurement under the ceiling on a chandelier, then you will also find the presence of voltage on all three wires, except for the ground wire. 
To make this effect disappear, it is enough to unscrew the bulbs themselves from the shades.
The third error occurs when connecting the phase supply wire on the switch, not to the main common contact, but to one of the outgoing ones. In this case, you will only have half of the chandelier glowing. 
The classic version of the device for lighting rooms is a chandelier. It makes it possible to distribute the light flux as evenly as possible. When installing a chandelier with one lamp, there are no significant difficulties, but with a larger number of lamps, certain design features should be taken into account.
Required tool
Chandelier - interior decorationBefore you start connecting the chandelier, you should prepare the tool necessary to complete this work. With such an organization, you will not have to be distracted by his search.
An indicator screwdriver should always be at hand. With its help determine the phase wire.
Holding electrical work and fixing the chandelier is not possible without a set of screwdrivers with different head shapes.
A multimeter is needed to check the correct connection of the electrical circuit elements.
Pliers are used to prepare wires and their installation.
Using a terminal block will simplify the process of laying out the wires when they are connected.
In addition to these tools, you need a knife, a marking marker and a stepladder. Before connection lighting device you should carefully study the instructions that come with it.
We deal with the wires of the chandelier
If you have instructions, connecting the chandelier is greatly simplified. This document contains a complete amount of information regarding the purpose of each wire, and describes how to connect them, as well as an electrical diagram. Wires are labeled as follows:
- white or brown - phase;
- blue - zero;
- yellow-green - grounding.
 Chandelier wires
 Checking the presence of a phase with an indicator
In the simplest version, the phase indicator looks like a transparent screwdriver. It contains a current-limiting resistor and an indicator, which is a light bulb. The device is equipped with two contacts. One of them is a probe made like a screwdriver, the other is a contact on the body. The probe is designed to determine the presence of voltage in the circuit, and touch the contact with your hand. The light signal indicates the presence of voltage.
The simplest indicators may have a poor-quality assembly or a poorly distinguishable indicator glow. In most cases, the design of this device does not allow it to be used as a screwdriver, since the case does not have sufficient strength. A weak indicator light may cause electric shock. The main advantages of such devices are ease of use and affordable cost. In general, the device copes with its function.
 Indicator
 When choosing it, you need to pay attention to appearance and operating voltage range. As a rule, the mains voltage is 220 V, so this value must be included in the range indicated on the case. In the case when the case does not inspire confidence and there is no information about the permissible operating voltages, it is better not to purchase such an indicator.
Professional level indicators are equipped with two poles and additionally, in addition to light, sound alarms. One of the contacts is made in the form of a probe with reliable insulation. The second is a slightly larger probe, the circuit of which includes an alarm.
The voltage test is carried out by touching one probe to zero, and the other to the wire that is being tested. The reliability and durability of this device are at a good level. However, to check, you need to know with certainty where the zero or ground goes. Otherwise, you will have to check all the wires in pairs. For use in the household, this is inconvenient, so the device is most often used in a production environment by professionals.
Checking the presence of a phase with a multimeter
The multimeter is measuring device with small dimensions, which is designed to perform various measurements and tests of electrical circuits.
 instrument multimeter
 Probes are included with the device. One end is equipped with a plug, necessary for connecting to the multimeter socket located on the front panel. The other end is equipped with a special holder that has a bare contact - a probe. It is he who is connected to the circuit under test. When using the device, you should remember the rule that electricians around the world adhere to: the probe is marked in red for connecting to the positive pole, black to the negative.
Before measuring the voltage in the circuit, set the device settings. In our case, this is alternating current and the measurement limit is above 250 V. Next, the probes are connected in parallel to the circuit, and the desired value is displayed on the device display. When determining the neutral wire, the multimeter is reconfigured accordingly.
Installation of chandeliers of various designs: step by step instructions
Chandelier with one lamp
To install a chandelier in a place where this lighting device did not exist before, markup is first performed. For this purpose, the center of the ceiling is determined, and the point is marked with a marker. When mounting in a false ceiling, a hole for wires is made, in stretch ceilings, restrictive rings are mounted and holes are cut out.
If the ceiling is made using a design approach and is complex design, then it is necessary to consider the option of the mounting system. To hang a massive chandelier, you will need to install an additional beam or metal chain.
The wiring goes from the mounting point of the lighting fixture and goes down the wall to the junction box, to which the power wires from the switch are connected.
Important: The junction box must be installed with a distance from the ceiling of at least 150 mm. In this case, there must be a margin of length of the wires located in the box, at least 100 mm.
The connection of wires in the junction box is carried out in accordance with the electrical circuit of the lighting device. After connecting them to each other, careful insulation with electrical tape is required, the wires are laid in such a way that they do not intersect. At the end, the box is closed with a lid, which is securely fixed.
Often, modern chandeliers have a mount, which is a bracket. This design greatly simplifies installation. The bracket is applied near the exit of the wires and mark this position. If fasteners are supplied with the chandelier, then the diameter of the drill must correspond to its diameter. It is not allowed to match the holes for the dowel and wires.
 In progress
 When laying the wiring, it is necessary to create some margin of length so that there are no difficulties in accessing the wires in case of dismantling the chandelier.
Before installation, the wires are stripped and connected using a terminal block in accordance with the electrical diagram. If the terminal block is not supplied with the lighting device, then the wires are connected on a twist. In this case, the length of the cleaned surface is 20 mm, and the wires are connected in pairs by twisting. In conclusion, the structure is covered with insulating tape.
If the chandelier has a metal case, then it is equipped with a special screw, which is designed for a grounding device. The ground wire coming from the junction box is stripped and twisted into a ring shape. This end is securely fixed with the specified screw.
After completing the connection and insulation of the wires, proceed to the installation of the chandelier. Before doing this, you need to make sure that the location of the wires does not match the fasteners.
Two or three lamp chandelier
The presence of two or three lamps at the chandelier does not significantly affect the installation procedure of the device.
The difference from a chandelier with one lamp lies in the number of wires that supply power. When connecting the simplest version of the chandelier, two power wires are connected and ground is connected. When connecting a lighting fixture equipped with two or three lamps, three wires are used for power and one for grounding. Switching of wires is carried out according to wiring diagram. To do this, they bring one wire from each cartridge to one point and connect it to zero.
When connecting a two-lamp chandelier, unused wires are connected to phase wires. In a three-lamp wire coming from the third cartridge, it is connected in parallel with the phase of the second or third cartridge. The connection method in this case is the same as when installing a chandelier with one lamp.
For the operation of such a chandelier, a wiring consisting of three wires leads to it. Turning on one of the keys will close part of the circuit and one lamp will light up, turning on the other will provide two lamps. Pressing both keys at the same time will turn on all the lamps.
Chandelier with four or five lights
An increase in the number of lamps in a chandelier does not have a significant effect on the technology for connecting the device. The process is completely similar to that described in the previous cases, except for the need to group the phase wires. Lamps are grouped at their own discretion, but there is a limit on the number of wires supplying power and the number of keys on the switch.
 Connecting a chandelier with five lamps has its own characteristics
 We connect the switch
Connecting the most simple option chandeliers with one lamp to a switch with one key is not too difficult. If the number of lamps is two or more, then the number of switch keys can be two or three.
In the case when there is ready-made wiring, and the number of lamp groups corresponds to the number of switch keys, it is replaced according to the connection diagram.
 Connection according to the diagram
 When installing this device on a new wiring, you should take into account the specifics of its design. Switches with two and three keys have a terminal that is common. It serves for switching with the supply wire coming from the distribution box. The remaining terminals, depending on the location of the keys and the selected order of grouping the lamps, are connected to the wires of the cartridges passing through the box.
Important: The switch must open the circuit by breaking the phase. This is a safety condition when replacing a burned-out lamp.
Measures with insufficient wire length
The chandelier is not always connected in a new building, so the situation is not ruled out when the available wire length is insufficient for connection. In this case, it is necessary to extend the wiring wires or the chandelier itself.
Experts recommend using a terminal block to connect pieces of wiring. This device is a plate made of plastic, on which there are conductive planes. On both sides there are screw clamps that serve to connect wires.
Important: When using this device, it must be freely accessible. This requirement is due to the fact that the connection weakens over time and worsens the contact of the conductors. As a result, the connection is heated, which can lead to a fire. If it is possible to replace the wire segments with a solid one, then it is recommended to do this.
After reading the title of the article, surely someone will definitely say - “why about e so-and-so write, with such work any landlord himself will be able to cope. Yes, of course, the installation and connection of a chandelier does not belong to the work of the highest category of complexity, however, these processes also have specific nuances, on which, by the way, the safety of living in an apartment depends.
The chandelier is connected to electricity, and all electrical appliances, if they are incorrect installation become source of danger - electric shock or even fire. In addition, this lighting fixture is often quite massive, and can cause a lot of trouble if it is not securely fixed to the ceiling. Thus, the whole complex of problems related to how to connect a chandelier with your own hands is conditionally divided into two directions - providing correct connection it to the mains and its reliable and most beautiful placement on the ceiling plane.
find out useful information, from our new article.
What to consider when choosing a chandelier
It is clear that the vast majority of apartment owners choose this lighting fixture, relying primarily on its external design, so that it matches the overall interior design of the room. However, at the same time, one should not forget about some other aspects of the choice.
- The total luminous power of the chandelier should correspond to the size and type of the room for which it is intended. There are certain illumination standards, which can be summarized as follows:
— For rooms where soft, diffused, subdued light is required (a typical example is a bedroom), one should proceed from 10 ÷ 12 W / m² of area.
— For rooms with an average level of general illumination (kitchen, bathroom, bathroom) or where it is planned to install additional lighting for specific workplaces (study or nursery) the norm will be from 15 to 20 W / m².
- For rooms with bright illumination (living room), this indicator is taken equal to 20 W / m².
In accordance with the calculated power, a lighting fixture with the required number of horns should be selected. Important nuance- in no case should you increase the overall illumination using more powerful lamps than allowed by the manufacturer. The material of the ceiling lamps, cartridges, the cross section of the internal wiring may not be designed for increased loads, and this will lead to damage to the device or even to a fire hazard.

- The dimensions of the lighting fixture must be in harmony with the overall dimensions of the room. A huge chandelier will look ridiculous in a fairly cramped room, or, conversely, too small will simply get lost on the plane of the ceiling of a vast hall. Designers recommend proceeding from the following considerations:
- The optimal diameter of the chandelier can be approximately determined by the formula:
D = ( L+ S)×10
D- chandelier diameter in centimeters
L and S- the length and width of the room, respectively, in meters.
So, for example, for a room with dimensions of 5 × 3 m the best option there will be a chandelier with a diameter of 80 cm.
- The type of chandelier you choose depends on the height of the room. If the ceilings in the room are low, about 2.5 m, then it is better to give preference ceiling option lighting device, so that from the floor to it was at least 2.0 ÷ 2.2 m. Hanging option will be appropriate in a room with high ceilings, and here the length of the suspension will be determined only by aesthetic considerations.
- Be sure to compare the type and material of the ceiling with the weight of the chandelier and the method of hanging it - this will be discussed below.
- Chandeliers are most often sold unassembled, so Special attention completeness, conformity of threads on all collapsible parts, integrity decorative elements. Be sure to check for clear and clear instructions for product installation.
- Unfortunately, the lighting market is literally oversaturated with cheap and low-quality goods and outright fakes for well-known brands. On such products, cartridges made of low-grade plastic, which is not designed for high temperatures, can be installed. They will issue a counterfeit poor-quality installation of the electrical part, twisting of wires, lack of terminal connections, etc. Often you have to independently carry out wire switching, their desoldering and insulation in accordance with all the rules. In particular, this applies to "fancy" chandeliers with LED additional circuits, power supplies or current transformation, devices remote control etc . In order not to take on these extra chores, it is better to choose a product with a really high-quality cable and electrical "stuffing", demand assembly and testing of the product in the store.
Prices for chandeliers and ceiling lights
Chandeliers and ceiling lights
We deal with the wires on the chandelier and on the ceiling
We will not consider in this article complex options with chandeliers stuffed with electronics - their installation in most cases will definitely require the services of an appropriately qualified specialist. But everyone should be able to connect an ordinary chandelier on their own.
First of all, a few theoretical questions from the field of home wiring. As you know, the power supply in our area is organized with a standard voltage of 220 V and a frequency of 50 Hz. Household wiring is carried out on two wires - phase and zero. If a ground loop is provided in the house (in modern housing this becomes a necessity and most often this issue is foreseen in new buildings), then a third wire connected to the ground bus is included in the wiring.
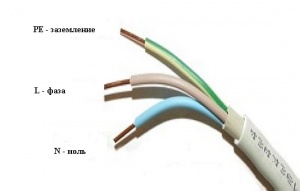
There is a generally accepted color marking of single-phase wires electrical network:

A characteristic nuance - if neutral wire always has a blue or blue color, and the grounding contact is yellow-green, then the color of the phase wire may vary:

Often, several phase wires of one or more colors can be assembled in one cable - this is used, among other things, when connecting lighting fixtures, to switch between different modes of their operation:

Ideally, both the chandelier and the house wiring should use this color coding. However, practice shows that in both cases this rule is not always observed. For example, in old houses, aluminum or copper wires in single color insulation. In this case, you will have to deal with them yourself.
Particular attention should be paid to safety measures when working with electrical wiring. It is strictly forbidden to touch bare wires with bare hands, unless the general power supply is turned off. You must wear shoes with rubber soles. To work under the ceiling, you need to provide a reliable foundation - an unstable stool or bedside table can lead to loss of balance, falling and injury. For these purposes the best option there will be a stepladder mounted on a rubber mat.
1. So, the easiest option is a cable with two wires coming out of the hole in the ceiling. It is clear that one of them is phase, and the other is zero. According to existing rules, zero should go directly to the junction box, and phase should be interrupted at the switch. Nevertheless, it doesn’t hurt to check - very often electricians “did not bother” with these issues.

- To check you need to have special device– phase indicator. Most often, it is made in the form of a screwdriver with a transparent case, although modern models may have other designs, including even an indication of the phase voltage value.
- First of all, it is necessary to completely de-energize the room or the entire apartment on the switchboard. This is necessary in order to thoroughly clean the wires from insulation and oxides to a length of 5 ÷ 8 mm. After stripping, the wires are bred to the sides as much as possible to prevent their short circuit. After that, turn on the machine on the shield.
- Then, with the switch in the off position, both wires are checked in sequence. None should show the presence of a phase. If there is a phase on one wire, then the wiring in the house is not done correctly - on the switch, apparently, “zero” is interrupted. It is very difficult to change anything in this case - it should just be borne in mind, exercising special care in further work.

- The phase is checked in the same way when the switch is in the on position. As a result, a phase wire will be identified, which can be marked in a certain way (with a marker or colored tape).
2. If a switch with two or more keys is installed in the room, then from the ceiling holes should be like the appropriate amount phase wires. The check is carried out in the same way as described above, with the marking of each phase separately, in accordance with the location of the switch keys.
A similar check should be carried out even if wiring is installed with color coding- just to eliminate the mistakes of an electrician who once installed it.
3. Now - about the cable part of the chandelier itself.

- The easiest way is when the chandelier is one- or two-three-horn, without dividing them into groups. All wires from the cartridges are assembled into two contact groups - zero and phase. If there is a ground wire, then it is usually attached to the metal body of the lamp.

- In the case when it is necessary to divide the horns with cartridges into two or more groups, then all the blue "zero" wires are connected into one bundle, and the phase wires are divided into several, according to the number of keys on the switch.
Very often, this can be seen quite clearly on chandeliers, and such switching will not be difficult.
 The simplest case: all the wires are in full view
 - In both cases, the bundles of twisted wires should be thoroughly soldered and placed in a screw terminal block or separate spring terminals.

- It is somewhat more difficult to understand when the device of the chandelier does not make it possible to visually understand its internal wiring. However, here you can figure it out by ringing all the outgoing wires using a multitester. To do this, you can sequentially screw an incandescent lamp into the cartridges (an energy-saving fluorescent lamp will not help in this case), and empirically find out which horn is powered from which wire. After that, it will be easy to distribute the horns into groups.
 For "call" hidden wires you need a multitester
 There are other methods for determining the internal wiring of a chandelier, based on calculating the resistance of a circuit with lamps of the same rating screwed into all cartridges, but in practice it is still probably easier to just ring each horn.
So, the result of checking the chandelier circuits and stationary wiring in the room should be a clear understanding of the circuit, prepared for switching and marked wires on the ceiling and a group of contacts on the lighting fixture itself.
Video: wiring diagram for a five-arm chandelier to a two-gang switch
Mounting a chandelier on the ceiling of a room
If everything became clear with the electrical part, it is necessary to ensure that the chandelier is securely fastened to the ceiling. The technology of work depends on the design of the chandelier, and on the type of ceiling covering.
Hanging a chandelier on a hook
This is an old and proven method of mounting chandeliers, which have a special loop, ring or hook for this purpose.
In old high-rise buildings hanging hooks were installed in the ceiling holes at the construction stage. If it is worth it, then the problem is less, however, it does not hurt to check it for strength. To do this, you need to hang the load with total weight, twice the weight of the chandelier planned for installation. If such a load is easily maintained, then there should not be any special concerns.
But what if the old hook is unreliable or its condition does not inspire confidence that it will withstand the load? No problem, you can install it yourself.
FROM wooden ceiling there should be no problems in principle - a hook-screw is easily screwed in there.

FROM concrete slab overlaps can be various solutions:
— You can hang a hook on a transverse steel rod, which is inserted into the cable channel of the plate. In this case, care must be taken not to damage the wiring passing there with the rod.

- Another option with an old hole in the ceiling is to insert a hook with a “butterfly” lock into it. Having passed into the cable channel, the “wings” of this fastening will straighten and create the necessary support, and all that remains is to fix the entire suspension with a washer and nut.
 Hook with a spring retainer - "butterfly"
 - If this option is not possible, for example, in the case when there is no “regular” opening for the hook, it will be necessary to drill in concrete floor a hole for a plastic dowel, but better still - under metal anchor with ring or hook.
Before drilling, it is useful to evaluate the direction of the wiring from the junction box to the outlet on the ceiling, so as not to accidentally break the cable with a drill or break its insulation.
If the internal cavity of the plate is caught during drilling, a special metal dowel for hollow structures - with screwing it in, a “skirt” is formed that securely holds the fastener in the ceiling.

After installing any type of hook, it should be tested for load - as described above. After that, it is recommended to insulate the protruding metal part by wrapping it with electrical tape or putting on it a heat-shrinkable tube of the appropriate diameter, followed by heating.
If the hook is reliable, you can hang the chandelier for a regular mount. Be sure to turn off the general power supply of the room in order to connect the contact part. The wires are connected by terminal connectors - twisting is not allowed, as sparks can occur on them with melting of the insulation. The connection is carried out in full accordance with the wiring diagram, about which it was written above.

The place of the contact connection of the wires and the suspension on the hook is usually closed with a decorative glass (cap).
After completing the installation, turn on the power supply at the panel, then at the switch, in order to immediately verify that there are no short circuits. It does not hurt to check the absence of a phase on the metal body of the chandelier with an indicator. If everything is fine, then when the switch keys are turned off, the necessary lamps are screwed or inserted into the cartridge and the practical functionality of all chandelier horns is checked in all switching modes.
After checking, you can proceed to the final installation of the chandelier - installing shades, hanging all removable decorative parts, etc., according to the assembly instructions attached to the product.
Installing a chandelier on a mounting plate
Many manufactured chandeliers, especially those designed for low spaces, are not hung on hooks, but are installed using screw fasteners on a special mounting plate fixed to the ceiling. This greatly improves the reliability general installation, since the load is evenly distributed over several attachment points.

The design of the mounting plate can be different - it all depends on the specific model of the chandelier and its weight. The bar can be straight or curved, with brackets for fixing the body of the lighting fixture, or with protruding studs or screws.

Particularly heavy chandeliers can be supplied with cruciform planks or in the form of a reinforced I-profile.
The bar may have a hole with the edges covered with an insulating sleeve for the passage of wires coming out of the ceiling. You can also place the bar in the immediate vicinity of the cable exit point - the case installed chandelier will hide both the hole in the ceiling and the switching of wires.

The mounting plate is fixed to the ceiling plane different ways depending on specific conditions. In fact, this is described above, with the only difference being that instead of dowels with a ring or hook, ordinary ones are used, with a clamping head “under hide».
As well as when using a hook, the reliability of fastening under load must be checked.
 The mount must be checked under load - in order to prevent such situations
 Quite often, a situation occurs when the excessively close location of the dowels from the old hole in the ceiling does not ensure the reliability of installation - the edge of the concrete may crack or crumble. So optimal choice fasteners and installation sites still remains with the direct executor of the work.
Fastening the chandelier itself to the mounting plate can also have its own characteristics. Perhaps, in this case, help is required - the lamp will have to be held on weight while the cable part is being switched. After the wires are connected, the body of the chandelier is attached to the bar with decorative nuts or screws.
Further work on performance monitoring and final installation is no different from what was described above.
Features of fastening the chandelier to the plasterboard ceiling
By by and large, you should plan the placement of the chandelier even before its installation. In this case, no problems are foreseen - one or more additional metal profiles for attaching a mounting plate or installed a hook, which will then be easy to build up with a chain or rod. AT drywall sheet a hole is immediately marked and drilled in the right place for the exit of wires and a hook.
But what if this question of hanging a chandelier arose later?
- In the event that the lighting fixture is hanging type, it is impossible to install the hook directly in the GVL - its strength is unlikely to be enough for a point load. You can do it like this:
A hole is drilled in the ceiling with a diameter smaller than the decorative cap of the lamp.
Exactly in the center of this opening, a hole is drilled in the floor slab along the anchor fastening with a long drill installed in a puncher.

An anchor is inserted with a long threaded stud and is fixed to the limit in the hole made, so that the pin goes out, beyond the plane of the drywall.

An eye nut is screwed onto the protruding end of the stud, to which the chandelier itself will later be hung. The excess hairpin is carefully cut off with a hacksaw.
 Spring "butterfly" with a hairpin
 If there is a void or an old hole in the ceiling - everything also, just like when working on ordinary ceiling, only fasteners do not have a ring, but a long threaded part, so that it comes out.
- If the chandelier is a console type, that is, it is installed on a mounting plate, then a lot depends on its mass.
- In case when total weight from the lamp does not exceed 3 - 5 kg, you can fix the bar directly to the GVL sheet. For this, special dowels for drywall are used - “butterflies” or snails.
 Dowels "butterfly" and "snail" for fixing parts on drywall
 The first are held as a result of the spread plastic construction under a sheet of drywall when screwing in a self-tapping screw. The second principle of operation is different - a very high and sharp thread with a large plane of contact with the sheet material creates a reliable connection when screwing in. The "snail" is screwed in completely, flush with the GVL surface, in the right place, and a hole remains in its center, into which an ordinary self-tapping screw easily enters.
- If the chandelier is heavier, then to fix the mounting plate, you will have to resort to the method with anchors with studs. - as described above. The protruding threaded parts of two or more studs will become mounts for a slatted or cross-shaped console.
Everybody next steps are no different from mounting a chandelier on a regular ceiling.
Video: fixing a chandelier to a plasterboard ceiling
Prices for different types of anchors
Anchors
Mounting a chandelier on a heavy ceiling
None practical advice on self-assembly chandeliers on a heavy ceiling will not be given - this should be done only by craftsmen and exclusively before hanging the ceiling canvas.
Read detailed information, about what is important to know in our new article.
To install the chandelier, a mounting platform is prepared in advance and suspended from the floor slab, the lower cut of which should fall on the planned height of the stretched canvas. Based on the location of this embedded platform, the craftsmen must cut and properly process the holes themselves, reinforcing their edges, through which the wires and fasteners will pass.

Attempts to cut holes yourself in order to hang the chandelier on an already installed stretch ceiling, using methods of work by type plasterboard ceiling, will not lead to anything good. With a probability close to 100%, they are doomed to failure. A deplorable, but logical result of such amateur activity will be the need complete replacement canvases.
After the “ceiling” masters finish their work, leaving the necessary holes reinforced with special eyelets for the chandelier and fasteners, the installation of the lamp is carried out with the utmost care so as not to break or puncture the surface in any case.
On a heavy ceiling, it is preferable to use a pendant one so that the lamps are not in close proximity to the canvas. In addition, ordinary incandescent lamps, " halogens" or fluorescent "housekeepers" are not suitable for these purposes - they will quickly spoil the decorative effect of the ceiling covering. Therefore, in order for the ceiling to retain its attractiveness for as long as possible, only LED models are needed.
Video: an example of mounting a chandelier on a heavy ceiling
The owners, wishing to equip the house with a new, more attractive source of light, enthusiastically choose chandeliers, sconces and lamps. If everything is simple with lamps and sconces, plugged into an outlet and works, then questions may arise with a chandelier. However, after the purchase is made, the following mandatory steps will be:
- assembling the chandelier, how long this stage will last depends on the complexity of the chandelier design,
- ceiling chandelier installation.
You can assemble a chandelier for relatively a short time, if you follow the instructions in the attached file and apply elementary tools. But how to connect the chandelier correctly, is that a question?
Connecting a ceiling chandelier is not difficult, but in order to do it correctly, you must have knowledge in the field of electrics. Most people do not know how to do this, since the laws of physics have been studied by them for a long time. It turns out that you will have to seek help from a person who knows how to connect a chandelier or a professional. Or get acquainted with the safety rules for installing a chandelier.
- First of all, getting started, you must turn off the power to the room in which the chandelier will be installed. (In other words, turn off the power that comes up to the wires sticking out of the ceiling, for this it is not enough to turn the switch to the off position, experts recommend turning off the machines located on the shield).
- Prepare the wires for testing, for this they must be opened. This is done in order to prevent their contact. The wires must be signed in accordance with the accepted marking, the letter N indicates the neutral wire, and the Latin phase is L. Using an indicator screwdriver, touching the bare areas in turn, you can determine which of the wires is which type of power is supplied. When the LED lights up upon contact with the wire, this is a phase and should be noted, since voltage passes through it.
- After the wires have been sorted out, the power supply is turned off again and only after that proceed to installation work. For connecting wires, it is better to use terminal clamps,

they are much more efficient than traditional twisting, although it is perfectly acceptable to use it. Only in this case, be sure to protect the twisting point with protective caps.

Protect the strand with electrical tape or PVC tape not worth it, it will dry out over time, which significantly reduces its characteristics.
There are several options for connecting a chandelier, on which it depends how exactly the chandelier will be connected.
- From the number of wires that come out of the chandelier;
- From the number of wires that stick out of the chandelier;
- From the number of keys on the switch.
This article describes in detail various schemes chandelier connections, which will tell you how to connect the chandelier of your chosen design.
Option number 1 Two wires on the ceiling and two wires on the chandelier.
The easiest way to install a chandelier. It requires almost no effort. For this case, it is enough to connect two wires from the chandelier to the wires on the ceiling. Before making a connection, it is imperative to determine where the phase is and where is zero. In this case, the installation of the chandelier does not matter in what sequence the wires are connected.
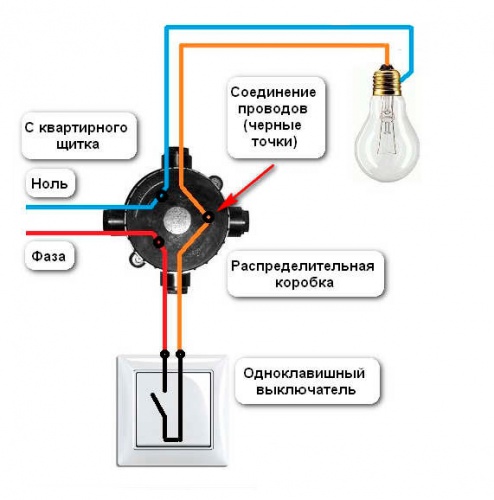
a) A diagram of how to connect a chandelier with one light bulb to a single-gang switch.

The diagram shows exactly how the chandelier is connected. The wire carrying a zero charge, indicated by blue, which comes from the switchboard must be connected to the neutral wire of the lighting fixture. The brown wire is a phase, it must be connected not only to the chandelier, but also to the switch.
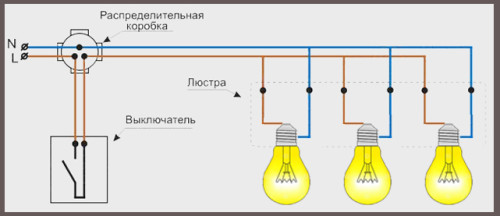
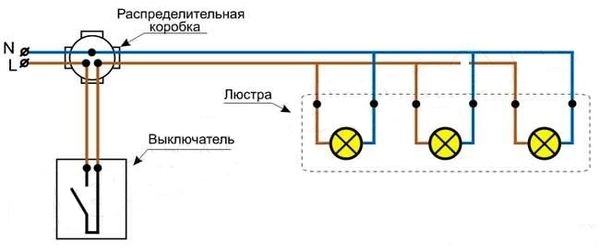
b) A diagram of how to connect a chandelier with two or three bulbs to a single-gang switch.

Before connecting a chandelier, which has two or three light bulbs, to a switch with one key, you should connect all the zero wires coming from it, and only after that with the one coming from the junction box. In a similar way, the wires with the phase should be combined with each other, and only after that with the one that comes from the switch.
Option number 2 Two wires on the chandelier and three wires on the ceiling.
In modern buildings, wiring is laid from a three-core cable, in which the wires are painted in different colours. Thus, the following picture is obtained, three wires fit to the place where the chandelier is attached. How to connect a chandelier in this case, because there are only two of them in it? First of all, using the indicator, you need to determine where which wire is on the ceiling. Usually two of them are a phase, and the third is a neutral conductor. The presence of two phase wires indicates that this chandelier can be connected to a two-gang switch. But since in this case a chandelier with two wires is considered, it is quite acceptable to use a single-gang switch. In this case, it is necessary to proceed as follows, de-energize the site and isolate one of the phase wires. And after that, the chandelier is mounted on the ceiling according to the previously described method.
Option number 3 Three or more wires on the chandelier and two wires on the ceiling
In the case when only two wires come out of the ceiling, there is only one option for mounting the chandelier, and it does not depend on how many wires stick out of it, all the bulbs on it will burn at the same time. The connection sequence is very simple, combine all the neutral wires together and then connect them to the wire of the same name on the ceiling. The same actions are done with phase wires.


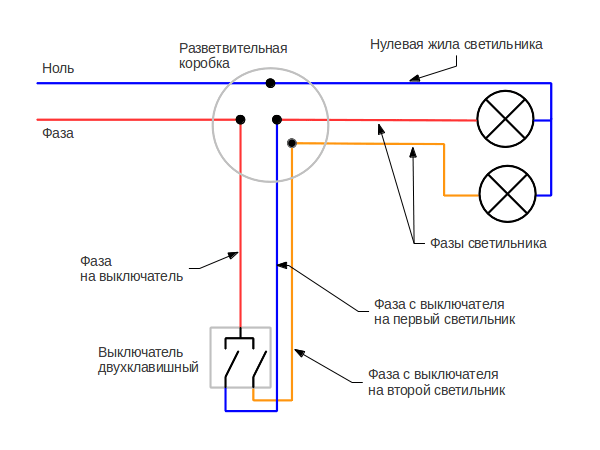
Option number 4 Three or more wires on the chandelier and three wires on the ceiling.
For this connection method, it is supposed to use a switch with two keys. It is this approach that provides rational lighting in the working area of \u200b\u200bthe room, and combine the sequence and number of lamps on. In this case, the wires coming out of the ceiling are usually labeled as follows:
Phase wire L1
Phase wire L2
Neutral wire N
Since the color scheme of the connection is not always observed when laying electrical wiring, and also, depending on the type of cable used for wiring, it is imperative to check the purpose of each wire using an indicator screwdriver. If there is no indicator, then you can disassemble the switch and inspect the connection sequence. And determine what color wires go from the switch to the ceiling, which phase wires will go to the switch, and zero from the shield goes directly to the chandelier.
It should not be forgotten that all work with electrical wiring is carried out only with the power turned off. Connecting this type of chandelier to a two-key switch differs only in that it is necessary to first divide all the wires that come from the lamps into two groups. It is this connection method that allows you to turn on one group of lamps when you press one switch key, and when you press another, connect the rest.
Connection in this form makes it possible to connect to one key the inclusion of both one and several lamps.

This example demonstrates the connection of two lamps to one switch key, and three steel ones will be turned on with the help of the other.

And this example demonstrates the connection of three lamps for each switch key.

It is quite possible to connect a chandelier of 6 horns in such a way that one key turns on 5 lamps at once, and the second - one. If the chandelier you purchased has a larger number of horns, the connection is carried out according to the principle already described, it is enough to distribute the lamps into groups and connect them to a specific switch key.

Option number 5 Three or more wires on the chandelier and four on the ceiling.
If the electrical wiring was laid relatively recently, then it is quite possible that in this case a ground wire is provided. He performs protective function. This wire usually has a yellow- Brown color, it is customary to label it PE - which means a grounding conductor. The remaining wires are the phases L1 and L2, and the wire carrying zero charge. If a ground wire is provided in the design of the chandelier, it must be connected to the wire of the same name that comes out of the ceiling. If there is no ground wire, then the one that comes out of the ceiling must simply be insulated.
How to connect several chandeliers to one switch?
This question arises when there are several sources of artificial lighting in the room. For example, these are large halls where several chandeliers are located or a living room in which several groups of halogen or LED lamps. Sometimes it also becomes necessary to connect chandeliers that illuminate different rooms on one switch.
There is a specific scheme for this type of connection. All chandeliers must be connected in parallel. That is, each of the chandeliers can be connected through separately located junction boxes, or in one it depends on the wiring distribution scheme in the room. This is the most common way to connect kitchen, toilet and bathroom lighting to a single switch. This is very convenient, as it allows you to turn on the lighting in the right room from the corridor.
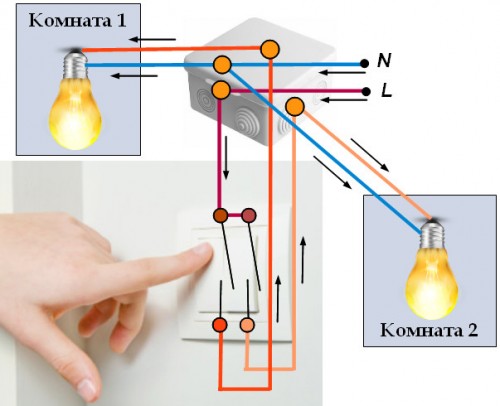
How to connect a chandelier to two different switches?
In order to perform this type of connection, you will have to purchase special pass-through switches. They differ from conventional switches design features and the presence wiring diagrams three contacts. If you connect the contacts, as indicated in the diagram, this will allow you to control the lighting according to two switches at once.

The figure shows that in pass-through switch There are three contacts:
- common, which gives an output for connecting to a chandelier or to a wire with a phase
- the other two switches of this type are interconnected with their help.
Due to the design features, such a connection must be thought out in advance, or you will have to lay an additional wire and make additional cosmetic repairs.
Halogen lamps - the advantages of their use and wiring diagrams.
It is no secret to anyone that using halogen lamps is much more profitable than incandescent lamps. Not only because of their efficiency in terms of electricity consumption, but also because of the breadth of the range on the market. Lighting from such lamps remains as bright as when using incandescent lamps, if not many times brighter. Halogen lamps are low voltage lamps of 24, 12, and 6 volts.
The only mandatory requirement when connecting such lamps is the installation of a special step-down transformer in order to convert 220 watts. in the requested lamp rating.

In order to connect several halogen lamps to one switch, they must first be connected in parallel with each other.
Transformers, due to their small size, can be easily placed in the false ceiling frame.
Depending on the planned ceiling design, the number of fixtures and transformers may vary. It must be remembered that each step-down transformer must be connected to the network separately. Laying a new electrical line. The wires to them will converge in one junction box.

Such transformers have features; they must be located at a distance of at least 20 cm from heat sources. Experts also recommend not to exceed the length of the wires coming out of them by more than 2-2.5 m. If they are broken, this can affect the degree of brightness of halogen lamps.
Chandelier with remote control - luxury or convenience?
The latest developments in the field of lighting are chandeliers with a lighting control panel, which includes all control elements.
Of course, the positive aspects of the chandelier, which is controlled through the remote control, are obvious, so it will allow you to put out the light without getting up from the sofa or getting out from under the blanket, you do not have to be afraid of hitting corners and furniture.
The installation of such a chandelier does not require any specialized knowledge, since it is connected in exactly the same way as an ordinary chandelier, as you wish, using one of the methods described. Lighting allows you to control the lighting controller built into the chandelier. Still, don't get rid of wall switch, since the remote control can always run out of batteries or it can be lost.
The chandelier is ceiling lamp, which should provide shadowless lighting in the room. Light is evenly distributed by spotlights located at a certain distance from each other. Light sources today are incandescent, fluorescent and LED.
Purchasing a chandelier is a pleasant moment when you finish furnishing your home and after buying a new piece of furniture, it remains to connect it. Assembly time depends on the complexity of the design and the type of fastening. Moreover, you can cope with this task quickly and easily, just follow the instructions and have simple mounting tools, and in order to connect it, you also need to understand the electrician.

A multi-lamp lamp is available in all apartments and houses. For even distribution of light, it is usually located in the center of the ceiling. Let's see what knowledge is required to connect the chandelier with your own hands.

Where to begin?
First you need to figure out how many cords come out of the ceiling. Usually there are two or three. If there are two of them, then the design provides for the simultaneous inclusion of all the bulbs and there will be no difficulties with connecting the chandelier. And the presence of three cords makes it possible to turn on the bulbs individually and group them to change the level of illumination. As a result, the difficulty arises in the fact that you need to understand which wires to connect to each other. In order for the chandelier to work properly, it is important to connect everything correctly. Before starting work, be sure to familiarize yourself with the cable arrangement. So, let's proceed in order.
Observe safety precautions
The main requirement during the connection of the chandelier is the de-energization of the entire section of the electrical wiring. Simply turning off the light in this case is not enough, you need to completely turn off the machines in the shield.
Then you need to prepare the cables for testing. They should be opened to prevent further contact with each other.
According to the marking, cables are designated with Latin letters:
It should be noted that the marking is not always present, because it began to be applied not so long ago. In this case, you should use the machine located in the shield and turn the switch to the "ON" position. Then, with an indicator screwdriver, you need to touch the bare ends in turn - if the LED lights up inside during the process - the cable is energized and is a phase. After determining the types of wires, turn off the power again and proceed to connection work.
There are two ways to connect cables to each other:

Chandelier mounting options can be found by clicking on the link:
The following parameters can affect the way the chandelier is connected:
- the number of cords in the chandelier;
- the number of wires in the ceiling;
- number of keys on the switch.
Scheme one. Two cords on the chandelier and two wires on the ceiling
This method of connecting a chandelier is the easiest, because it does not require special efforts. In this case, it is necessary to simply connect the cables to each other using a twist or terminal block, having previously determined where the phase is and where it is zero. Moreover, the connection order can be any.
Zero cable (in the diagram of blue color) should be connected from the junction box directly to the neutral wire coming from the lighting device. And the orange cable, with a phase, should be connected to both the chandelier and the switch.

When connecting a chandelier with a large number of light bulbs to a switch with one key, you must first connect all the neutral wires of the chandelier, and then connect them to the neutral cable from the junction box. Then combine them with the phase and lead to the switch.
It is important to know! According to the requirements of the electrical installation rules (PUE), the phase must be connected to the central contact in the electrical cartridge, and the phase wire must be opened by a switch. Compliance with these rules will increase the safety of the operation of lighting devices.
Scheme two. Two cords on the chandelier and three wires on the ceiling
Today, in the construction of houses in electrical wiring, three-core cables with wires of different colors are used. It is logical to assume that three wires will need to be connected to the lighting fixture. How to connect a chandelier in this situation, if it has only two cables?
To begin with, using the indicator, you need to deal with the types of wires that come out of the ceiling. Two of them will be phase, and the third will be a conductor. Two phases in this case imply a switch with two keys. However, given the fact that the chandelier has only two cables, a switch with one key will suffice.
It is important to know! Before connecting, it is necessary to carry out insulation, having previously turned off the voltage.
Scheme three. Three or more cords on the chandelier and two wires on the ceiling
In the case when only two cables come out of the ceiling, all the lamps in the lighting fixture will burn at the same time. To connect, you need to combine the neutral wires, and then lead them to the zero ceiling cable. Next, it is worth repeating the procedure with phase.
Scheme four. Three or more wires on the chandelier and three on the ceiling
This connection option can provide a more reasonable use of lamps. It will be possible to combine their work or turn them on in turn. In this case, a two-gang switch will be used.
Ceiling wire marking is as follows: phase - L1 ( orange color), phase - L2 ( yellow color) and zero - N (blue). Due to the fact that manufacturers of cable products do not always indicate the designations, and electricians when installing wiring may not adhere to standards color scheme, before connecting them, it is better to independently double-check their purpose with an indicator screwdriver.
It is important to know! Do not forget that phase cables are always laid to the switch, and zero cables to the lighting fixture.
Connecting a chandelier with several cords is carried out with a certain sequence of actions. First, the wires from the light bulbs must be divided into two groups. All sections are individually connected to only one wire, to which the phase leads, and then the sections are combined with zero.

With this setting, one group of light bulbs will light up with the first key, and another group with the second. This connection option allows you to connect one, two or three bulbs together using only one switch button.
The second way to connect a chandelier, for example, with six horns - the first key turns on 5 light bulbs together, and the second - the sixth.
FROM a large number horns in the lighting device, the installation will take place in an identical way. It remains to decide which combination of lamps you want to use in lighting this room.
Scheme five. Three or more wires on the chandelier and four on the ceiling
If it is necessary to connect a chandelier in a new building or a private house, most likely, a cord with a protection function will come out of the ceiling. As a rule, this cable is yellow-green and is marked in Latin letters PE, which literally means a grounding conductor. As a result, from the side of the ceiling there will be wires with phases L1 and L2, a neutral wire and a fourth pinching wire - PE.
In no case will such a cord interfere with the connection - just connect it to the yellow-green wire from the side of the chandelier. If the lighting device does not provide for the presence of this wire, then the cable is insulated from the ceiling side.
Installation of several chandeliers on one switch
This connection case is very relevant for lighting control in several rooms, large living rooms or in a room with false ceiling with a group of LED lamps.
In this situation, all lighting fixtures must be connected in parallel.
Moreover, each chandelier can have its own junction box.

Mounting three chandeliers on a three-gang switch
This connection method is used in kitchen, toilet and bathroom lighting, and the three-button switch is very convenient here.
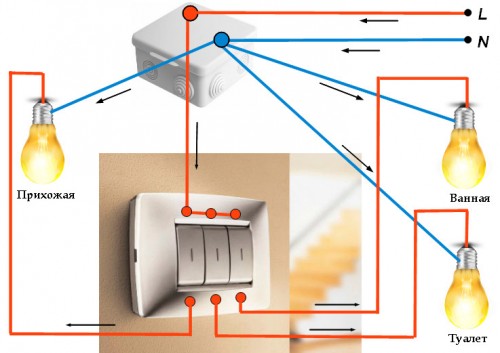
Also, a switch with three keys is used in the corridor to control the light in different areas.
Installation of a chandelier with a fan
Connecting such a model is enough rational decision especially in hot weather. Before installing this type of lighting device, you just need to read the instructions, which will detail the connection diagram.
To make it clearer: the fan in this case acts as another lamp, which is connected in parallel.
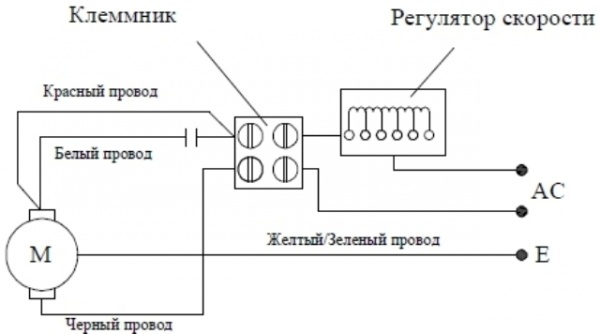
At your request, you can also make a separate switch key for it.
As you can see, connecting a lighting fixture is a simple task if you know how to do it right. Follow the diagrams, follow the installation rules, and you can easily cope with the connection without outside help.