How to make a warm greenhouse yourself. Infrared heating of the winter greenhouse. Make heating yourself or order ready-made
The bulk of greenhouses built on summer cottages, designed for growing early vegetables and seedlings. Such greenhouses put in order in early spring, and after the last harvest in the fall, they remain idle until the next spring.
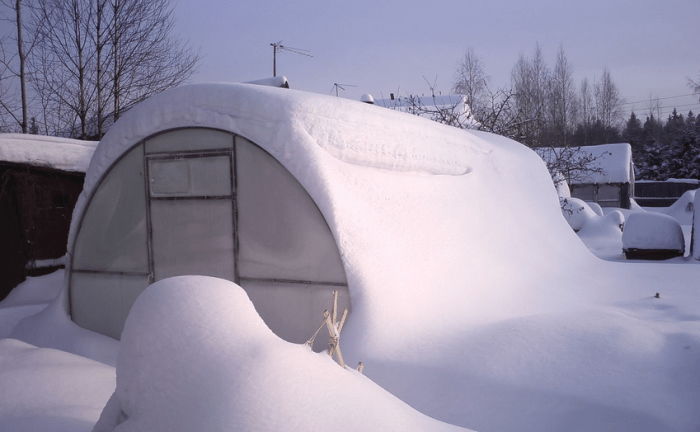
Today we will talk about greenhouses, which allow you to grow vegetables not only in the autumn-spring period, but also in the winter months. These are the so-called winter greenhouses. Their main difference is a more capital construction and the presence of a heating system. The winter greenhouse (pictured below) will also help grow vegetables in the more severe climate of the northern regions of the country and in Siberia, or arrange a real winter Garden.
Despite the apparent complexity, the construction of a winter greenhouse is within the power of any summer resident. The reward for your efforts will be fresh, organic vegetables that will be on your table at any time of the year.
To do this, several layers of organic debris are laid under the beds for growing vegetables: leaves, tops, branches.
- It is necessary to lay the larger material first, then the smaller one.
- From above, the bed is covered with a 10-centimeter layer of fertile soil.
Such a device, thanks to the processes of decay and the heat released, will help to ensure additional heating in winter period.
- Greenhouse-thermos
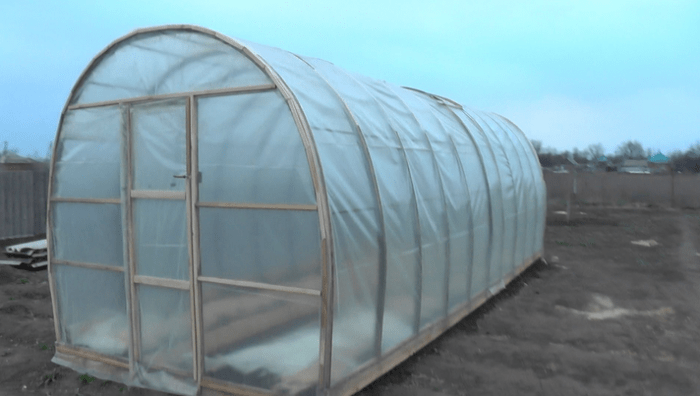
Also known is the method of building a polycarbonate greenhouse, which allows even with very severe frosts in Siberia to keep the temperature inside the greenhouse at +20. This is the so-called thermos greenhouse (in the next photo).
When constructing such a greenhouse, its walls are deepened down to the freezing line, and the roof is made of two layers of polycarbonate. Heating of this design will require much lower energy costs.
After the heating of the greenhouse is ready, you can start arranging the beds.
In winter, additional lighting will also be needed, so a winter greenhouse must be equipped with lamps.
The final stage of arranging the greenhouse is planting plants for their further cultivation.
Recently, winter greenhouses have become popular, in which they grow not vegetables, but exotic plants and flowers.

Winter garden - extension to the house
It can become a wonderful place to relax in the cold season and please with greenery and flowers when everything around is covered with snow.
In the arrangement of the greenhouse and the winter garden have some differences.
So, a winter garden is usually built as an extension to the house (pictured), so that during the cold period you can simply move from one room to another.
- Heating of the extension in winter is usually carried out from the same system that heats the house. Since the garden is intended for relaxation, it is necessary to provide a place for furniture.
- To build a winter garden, glass and double-glazed windows are mainly used, since this design has a more presentable appearance.
- The winter garden does not consist of beds, but of racks with plants, pots, tubs, which can be taken outside during the warm season.
It should be noted that a winter garden is a more expensive building, and it will cost much more than a do-it-yourself winter greenhouse.
About one of the most simple devices to heat the greenhouse with wood, the author of the following video tells:
To receive you need to good harvest and protect him from negative impact high humidity and fog, you need to take care of the arrangement of the winter greenhouse. Often, when building greenhouses or greenhouses, summer residents use plastic wrap, but it needs to be replaced annually, which entails certain costs. In this article, we will tell you how to build a polycarbonate greenhouse with your own hands, present photo and video installation instructions, and also demonstrate drawings, diagrams and types of polycarbonate greenhouses and profiles.
What is polycarbonate?
This building material is produced in the form of two-layer plastic sheets with different thicknesses. Most often, in the construction of winter polycarbonate greenhouses, do-it-yourself sheets with size 6x2.1 m with a thickness of 4.4 mm.
Polycarbonate has a number of clear advantages over polyethylene film and glass:
- The material completely protects the crop in the greenhouse from the negative effects of UV rays.
- Polycarbonate is characterized by high strength and is not damaged by light impacts (strength is approximately 250 times greater than ordinary glass).
- The material scatters the sunlight passing through it, that is, the combustion of plants is excluded.
- Withstands temperatures -45/+65C.
- It is very easy to process and easy to drill and cut.
- Double-layer plastic has high thermal insulation.
- The surface of polycarbonate has dust-repellent properties, and the resulting pollution is removed with ordinary water.
- Polycarbonate weight less glass which greatly facilitates its transportation and installation.
- Its price is similar to the cost of ordinary glass.
- Polycarbonate does not burn, but it melts on contact with fire.
How to care for polycarbonate?
In order for the polycarbonate winter greenhouse to be durable, it is necessary follow certain rules:
After studying all the features and benefits, you can start building a greenhouse with your own hands.
Polycarbonate greenhouse device
It is advisable to make a drawing or project of the greenhouse, as well as mark on the site the place where it will be located. Under the greenhouse will need a lot of free space away from structures and trees to ensure a large number of heat and light and good ventilation.
The project needs to display what kind of greenhouse will have. In this case a number of options are offered:
- the most common is the arched roof, especially when it is made of polycarbonate, but there are also difficulties in the construction arched roof. The arch is made from metal pipes and corners, and for this a pipe bender will be needed or you will have to buy ready-made arched structures;
- in shape, greenhouses come with a two- or single-pitched roof;
- in order to save heat and save materials, sometimes they build a wall-mounted greenhouse with a garter to an already existing building.
If the shape, dimensions, location are selected, and the necessary drawings are available, then the foundation can be started. For a greenhouse, the foundation is very important, and the strength of the greenhouse depends on how high-quality the foundation will be.
Technology for building a winter greenhouse
The best use of polycarbonate is to cover winter greenhouses with plastic, metal or wooden frame.
In any case, for cultivation, it is necessary to provide ventilation holes in the form of door and window openings. It is desirable to make the roof in the form of an arch, thereby increasing the air volume in the structure. The built-in lever system will allow you to open transoms built into the roof.
Important! The size of all transoms must be at least a quarter of the total roof surface. Additional ventilation will be provided by doors located in the end walls of the structure.
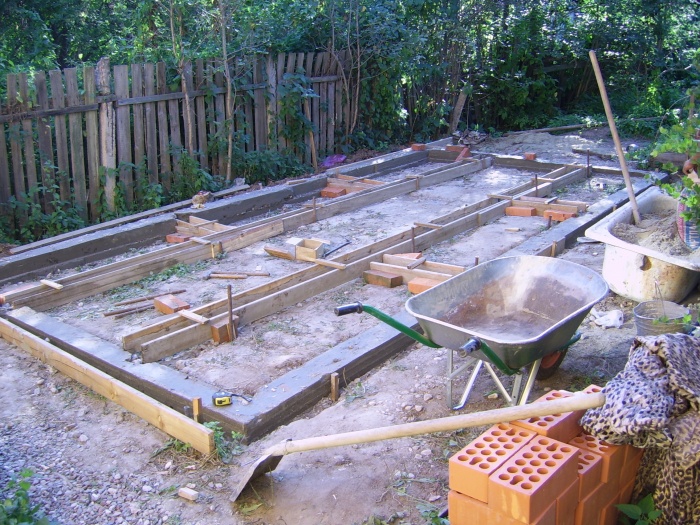
Foundation construction
The first step in the construction of a winter greenhouse is the construction of a foundation, at the same time as barriers are made for the beds. For the frame, it is desirable to use square metal corners or pipes. First, they make the strapping, and then fix it on the foundation.
Types and device of the foundation:
- brick;
- timber;
- tape;
- stone.
Bar foundation. In terms of costs, it is relatively inexpensive, but it does not last long, about 4 years, despite the impregnation with an antiseptic. After a while, the tree will begin to rot. If you need to make a temporary greenhouse, then this foundation is the best. The construction of the timber foundation is done in this way:
- around the perimeter general design metal corners are driven in;
- Wooden supports are fixed to the corners and hammered into the ground;
- pre-prepared wooden blocks with a section of 10x10 cm are laid around the perimeter of the base of the greenhouse.
 brick base different terms and quality of operation. If you build this foundation correctly, it will last you a very long time, but its construction will require quite a lot of bricks in order to support the weight of the entire structure. First, a waterproofing pad is constructed to protect against the effects of wet soil. During construction brick foundation conventional cement mortar is used.
The stone foundation is perfect option for the construction of a polycarbonate greenhouse, since this base is durable and can withstand any weight load.
During manufacture, this base is particularly complex. It must be taken into account that the masonry natural stone different shapes needs certain skills, and to do stone foundation Do it yourself is quite a difficult task. For the solution, it is best to use clay-sand mixture in a ratio of 1:1. This solution will contribute to thermal savings. To prevent the clay from being washed away with water, the foundation must be plastered, and if it came out uneven, then install the formwork and pour mortar around the edges.
In the manufacture of greenhouses, a strip foundation is most often used. The main advantage of this foundation is that the time, money and effort spent is relatively small, but the result is simply excellent. Since this type of foundation differs from the rest in reliability and durability. For its construction you will need:
- pillow protecting the base from subsidence;
- log formwork;
- concrete solution.
construction strip foundation happens like this:
- The pillow is made from sand or gravel;
- After that, the formwork is fixed according to the shape of the structure, and it is poured with concrete to a width of 35-45 cm, the depth is about half a meter.
This technology will ensure the reliable strength of this foundation.
How the greenhouse is attached:

Polycarbonate profile
Plays a very important role well-designed frame from quality materials, one of them is a profile. We will not dwell on the factory profiled structures, since in the purchased kit you can find detailed instructions for the construction of the frame. Let's dwell on the most economical way of the frame - a frame made of a drywall profile. A structure with rounded shapes will not work, but the frame will be quite reliable to contain wind and snow loads. Consider main advantages of using this material for the construction of the frame:
- It is convenient to fix polycarbonate sheets.
- The profile is galvanized, therefore it is not afraid of moisture.
- Low price.
- The construction is quite light.
- The ability to make a frame with your own hands, without the involvement of assistants.
Important: If the greenhouse is quite large, then it is advisable to buy a wall profile, since it is more durable.
First you need to make a drawing or draw a sketch of the future greenhouse, taking into account the dimensions. Then, using this data, cut the blanks. Then it is necessary to attach a profile to the foundation with anchors, which will be the basis of the structure. Then you can start installing the frame.
As for the assembly of the frame, everyone chooses for himself how it is convenient for him to do. We advise you to assemble the arches on a flat horizontal surface, and then install and make the lining, as well as heating.
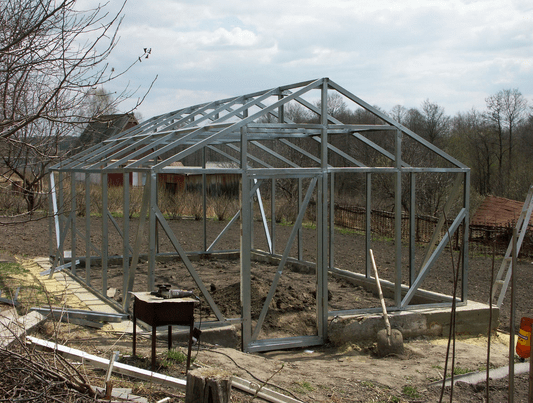
Pipe frame
 The frame for a winter greenhouse can be made from several types of pipes. If the frame is made of metal, then it is desirable to use profile pipes by welding them with electric welding. arched structure experiences less snow loads, but a pipe bender is required to give the pipe the desired shape. If you don't want to buy finished arches or bend pipes, then you can make the shape of the greenhouse the same as from metal profile – with sloping roof.
Racks are fixed to the walls and corners of the strapping by welding. At the same time, door openings are installed. over door structures and racks being constructed top harness where the arches are fixed. Then proceed with the installation of arched transoms on the roof and fastening the hinges to the ridge. Make a lever system to open the transoms, then start painting the frame. The arched structure made of polycarbonate and pipes is ready.
Easier and faster to build regular frame from polypropylene pipes. Again, you will need to complete the drawing and cut the blanks. To assemble the structure, you will need a soldering iron, and required number of fittings and pipes will need to be purchased in accordance with the selected type of greenhouse.
One of the clear advantages of a frame made of polypropylene pipes is an excellent combination of flexibility and strength. this material. Flexibility makes it possible to give the frame the necessary shape, and strength makes it possible to withstand heavy loads.
As for the door, it is made of the same material as the greenhouse. For convenience, here you can build a window for ventilation. Then, when the frame is assembled and attached, it can be lined with polycarbonate.
Heating and heating of the winter greenhouse
It is also important to take care of the heating and heating system of the winter greenhouse. Today, technology involves the installation of bubble or transparent plastic to heat the structure from the outside and from the inside. The advantage of this solution is that this material looks decent and does not absorb sunlight.
Winter greenhouse heating options:

Heating in a greenhouse may not be very cost-effective, but, so to speak, the goal, in our case grow rich winter harvest rather than save on heating.
At this stage, all technological nuances are completed, and now you have a do-it-yourself polycarbonate winter greenhouse. This design will enable you to big harvest and save it from the adverse effects of precipitation, fog and ultraviolet radiation. The high strength of the material will allow the structure to survive heavy rainfall in the form of hail and snow without any damage.
High-quality winter greenhouses are not only a building and a place where you can successfully grow vegetables and fruits, but also the status of a gardener, an indicator of his skill and a quality mark of a true gardener. But building a winter greenhouse is a rather complicated matter.
The construction of a greenhouse requires a deliberate approach, certain knowledge and skills. Below will be presented methods for making a winter greenhouse with your own hands, classifications of structures, a drawing and a photo.

To know how to build a winter greenhouse, you need to find out features each type.
Greenhouses for winter cultivation differ in terms of:
- Functionality. The winter greenhouse is a platform for planting not only vegetable crops, fruits, berries, flower beds and mushrooms, but also overseas plants, citrus fruits, grapes, etc. The choice of structure also depends on what the gardener is going to grow in a winter greenhouse.
- Finding relative to the level of the soil. There are three types of winter greenhouse with heating: a winter greenhouse in a garage or a barn, a greenhouse below ground level and a greenhouse above ground level.
- Structural execution. A variety of options for winter greenhouses have been developed here. The choice is wide: arched models, horizontal type, one-, two-, three-slope and combined. Types of designs for every taste. Here the choice depends entirely on taste preferences gardener, his opportunities in terms of money and the size of the plot and the future design.
- building material. You can make a winter greenhouse with your own hands from polycarbonate, glass, with a brick or wood base, with PVC and metal frame etc. You can often find combined greenhouses for the winter.
- Structural heating. Types of heating are also numerous. Heating of winter greenhouses can be carried out using biofuel, helium or technical devices: gas, electric, water, stove.
- Planting technique. Sowing can be carried out on beds or in prepared hanging boxes.

Territory selection
Competently and correctly choose a place for a winter garden - very milestone. The installation location of the winter greenhouse structure depends on three factors:
- Lighting. The winter garden should receive the optimal percentage sunlight, only in this case the harvest will be good. Therefore, you need to properly build a winter garden in length from east to west. This factor cannot be ignored, especially if the greenhouse is equipped with helium heating.
- Accounting for prevailing winds. If the site is located in Siberia or in another area where strong cold winds predominate, then protection, a special screen, must be built. Thanks to the correct design, it will be possible to significantly save on heating.
- Ease of access to the building. The place for a winter garden should not be cramped and uncomfortable, this will facilitate both construction and future operation.
If for protection from the wind it is decided to build protective screen, then it is necessary to make the device so that the wall does not adjoin the greenhouse.

The distance should be at least 5-7 m. If this is neglected, then the result will be a zone of turbulence and the greenhouse will give off a large amount of heat in winter. good protection- this is a fence 17-20 m from the greenhouse.
Production of a gable structure
You can start making a good greenhouse for the winter, as the necessary baggage of advice and knowledge has been received. This simple winter greenhouse project is characterized by versatility and is suitable for both the central area and the climatic conditions of Siberia. Do-it-yourself winter greenhouses this drawing, give the opportunity to grow not only garden, but also horticultural crops.
The device of this good greenhouse will cost a lot, but it's worth it. Such structures are reliable, safe and durable. What do large farm greenhouses look like? DIY winter greenhouses of this type consist of two rooms - a vestibule and a greenhouse.
The tambour room includes a heating boiler device, equipment for irrigation, ventilation, and lighting can be installed there. The best option the size of the tambour is 2-2.5 m. Among other things, the tambour room is effectively used for placing gardening tools, making soil mixtures.
The walls of the vestibule must be made of brick. Insulation can be made of foam or mineral wool. The roof is made of opaque material. Roofing metal, corrugated board or other reliable material is suitable as it.

Do-it-yourself winter greenhouses should have a partition, which can be made of glass on a metal-plastic or plastic profile, of course, there should be a door.
If a greenhouse is being built in the winter of an in-depth type, then it is necessary to choose the soil in the pit according to the level of the freezing layer. Usually this depth is 90 cm.
The same rule should be used when the greenhouse is placed on a concrete base in winter. If the soil is loose, then the foundation should be poured to a depth of about 50 cm. The main walls are built in one brick. The wall must be at least 25 cm thick.
Frames for future windows should be made 55 cm above the ground. The gaps between the frames are left at least 70 cm. This is about 2-3 bricks. This is done so that the plants can receive natural light.
- Drive out a plinth up to 120 cm high.
- Mount a frame made of metal, wood or combined.
- Sheathe the frame with polycarbonate sheets.
Builders recommend taking polycarbonate, the thickness of which is 8-10 mm. Frames must have vents so that the greenhouse can be ventilated in winter. Alternative option window vents can be installed ventilation valves.
gable roof gives the chance of free descent of rainfall, rain water, snow. The angle of inclination should be 25°. The strapping should be placed below on only. It is good to attach the ridge beam with the help of paired rafters. The roof of the greenhouse is traditionally made of two-layer glass, the thickness of which is 4 mm. Glazing is carried out according to the bars. We must not forget about the installation of gutters for condensate drainage.
Nowadays, often used as a coating cellular polycarbonate. The material proved to be reliable, durable and safe. The best materials for the roof - this is a strapping, it is advisable to take a bar for the ridge and rafters.
When glazing, it is necessary to lay the glass along the folds on the putty. Natural elastic mixtures should be taken as a lubricant. Glass should be attached to the screeds with a glazing bead on metal studs. The putty is applied to the surface between the glass and the glazing bead.

To protect the walls, it is imperative to provide a zinc visor, which is placed 8 cm from the walls. A trough must be provided to drain condensate and water.
The choice of material must be treated very responsibly. Covering material must have important qualities: strength, reliability, environmental friendliness. Any material must comply with the norms and rules prescribed in special documents, have the ability to retain heat inside the greenhouse, perfectly transmit sunlight and not create a lens effect.
When choosing, you need to pay attention to the cost of materials. It is clear that a quality product cannot be too cheap. However, the price is not always an indicator of quality. Before building, you need to consider what needs to be drawn up detailed diagram with photo, drawing. Everything should be described and shown in detail, then there will be fewer questions on how to build a greenhouse in Siberia or another corner of Russia and the building will be erected with success.

How to choose a good heating
It is necessary to select heating, depending on which usable area occupies the room. A heating stove is perfect for a small winter greenhouse located in Siberia or another region of the country. If the building is large, then you can choose one of the following heating options:
- Water heating.
- Electric heating.
- Heating with biofuel.
Water heating - this is the use of a water heater, a special boiler, pipes or an expansion tank. Pipes must be placed either in the soil or under boxes with earth.
Cable can be compared with the "Warm floor" device. Air heating of the greenhouse is carried out using special fans. IR heating is done using devices with infrared lamps.
The most economical heating option is biofuel heating. As it can be taken manure, overripe bark, straw, sawdust. biofuel must be laid under the fertile layer of the earth. Agronomists recommend paying attention to the pH level when choosing biofuels. It is optimal to take 6-7 pH for manure, 5 pH for bark and sawdust. Biofuel is also good because, in addition to heating, it additionally nourishes the soil, enriches it with useful microelements.
Drawings of winter greenhouses


The system of blowing the interfilm space of the greenhouse (video)
An economical option for a winter greenhouse
The drawing of how to make a non-capital type winter greenhouse is simple and accessible. Do not despair if it is not possible to build a solid expensive structure. By cheating and approaching the matter with ingenuity, you can make a good greenhouse without spending big money.
- If the future greenhouse is planned to be used for commercial purposes, and not only for the growth of vegetable and fruit products for oneself, then it is necessary to make a structure of at least 60 square meters in size. m.
- If follow this council, then the harvest will quickly pay for the finances spent. Experts say that farm greenhouses for medium-sized businesses should be at least 100 square meters in size. m.
Having prepared a little and gained knowledge and skills, you can independently build a good, durable winter greenhouse that will delight useful harvest all year round.
All hotbeds and greenhouses are clearly divided into two groups: those intended for growing vegetables and flowers in severe frosts, and those that are dismantled and hidden in a barn in autumn. And winter greenhouses are much more complicated both in their design and in their functionality than summer ones, and therefore it is not easy to build them. Although everything is possible if there is reliable, understandable information - as in this article, which describes in detail and in detail how a winter greenhouse is built with your own hands: detailed tips will help you figure it out.
Typical technology for the construction of such a building
So, how to build a winter greenhouse and what to look for during work? In the same way as the summer one - except that the foundation will be needed. And then, as soon as the installation of the greenhouse is completed, you can proceed to. So, polycarbonate greenhouses on biofuel are considered the most reliable in this regard - this is the most ideal option for giving. After all, technical heating has its limits, and it is not so cheap. But for a structure that stands right next to the house, it is quite suitable, because it can be connected to a communal heating system. So, in order to determine the correct heating wiring, it is necessary to take into account the following formula: the amount of heat demand = the temperature difference between the thermal conductivity coefficient and the glazing area. And calculating this value is just the first step.
Now you need to choose heating appliances. Aluminum convectors are considered one of the best, which evenly distribute heat throughout the greenhouse.
The next step is preparing the soil. Its optimal composition is a layer of sand + a layer of soddy soil + a layer of humus. To cultivate such soil, you need to prepare a mixture of a teaspoon of urea and one teaspoon of superphosphate - this way all pests will be destroyed in the winter.
So, as soon as all the elements of the heat accumulator are laid at the bottom of the pit and its ventilation pipes are installed, everything needs to be covered with PVC film from above. This is necessary so that the soil does not get into the heat accumulator and does not clog it in the end. On the other hand, such a coating helps to create good conditions for the accumulation of humus in the greenhouse.

Option # 2 - gable winter building
A solid gable winter greenhouse can also be built without problems with your own hands. It can be fenced with greenhouse frames or glazed. Even a small vestibule with a working room can be made literally from improvised means and in a relatively short time.
So, optimal design a winter greenhouse of such a profile looks like this:
- The foundation should be 40x40 cm in section.
- The walls must be laid out in one brick - 25 cm, and on them bars of 15x15 cm in cross section should already be placed, with obligatory grooves for greenhouse frames.
- The rafter part is made of bars with a section of 10x10 cm. The rafters themselves should be connected with longitudinal bars that are laid on the walls, along with ridge beam. The latter must be done with a section of 12x12 cm.
- Sew up all gaps between frames after work better with slats, and it does not hurt to install a galvanized profile on the visor.
Such a polycarbonate winter greenhouse with a glazed roof and heating will, of course, cost more, but it is more durable and much more convenient during operation. More expensive - because it will definitely have to be heated. Therefore, if you want to grow vegetables not at the price of gold, then it is better to invest more immediately, so that you lose less. What are we talking about? About modern heating cable which is used for floor heating.
Here detailed instructions how to build this miracle greenhouse:
- Step 1. Dig a trench under the foundation and lay 8 mm of reinforcement in it.
- Step 2 Lay about 50mm of EPS on the inside of the trench.
- Step 3 Install the greenhouse frame on the foundation and fill the foundation with concrete.
- Step 4. Lay the foam on the bottom of the greenhouse, think over a small drainage outlet if desired excess moisture from watering.
- Step 5. At this stage, you can paint the frame and fill in the first layer of the floor.
- Step 6. Next, lay the warm floor according to the manufacturer's technology (see the attached instructions).
- Step 7. To prevent the floor from cracking in winter, now, at this stage, tighten everything with a road mesh.
- Step 8. Make the final screed and fix the polycarbonate on the frame.
This completes the installation. Here's what it looks like:

Option #3 - Double Covered Budget Greenhouse
Here are some good advice regarding the construction of a winter greenhouse with a double film.
We cover the roof of the greenhouse with a triple air-bubble film, and we make the walls with a double ordinary one. Why is it different on the roof? The fact is that with a double ordinary film, condensate will constantly accumulate there, and it is quite difficult to remove it. Therefore, take a hydrophilic film upstairs - no drops will flow from it. And sunlight will still be enough for you.

For the winter in such a greenhouse, you need to fill up all the windows with planks, except for one, and starting from February, you can open one at a time. Underground heating is very important for a winter greenhouse: it can be pipes laid in the ground, electric heating or " ". And from severe frosts it is better to use additionally.
The most a big problem any winter greenhouse is not the air temperature and not even tons of snow from all sides. This is deep freezing of the soil. For example, in Siberia, this value can reach 2.3 meters! Naturally, freezing still gets to the greenhouse, and the soil inside needs to be protected from it. First of all, many use foam blocks or adobe blocks as a foundation, which, with cement mortar and polymer mastic from moisture replace with itself at 40 cm thickness 70 cm brickwork. Inside the greenhouse near the ground, it is also desirable to insulate - better with styrofoam well wrapped in thick polyethylene. Well, at least 40 cm of sand for additional moisture and heat protection.
For the rest, follow these tips:
Council number 1. Pay close attention to soil temperature. The fact is that the higher it is, the better plants assimilate micro and macro elements. But there is a limit here: about 16-18 ° C, after which plants emit less oxygen and the process of photosynthesis is much worse. That's why warm beds from biowaste in a winter greenhouse are not always needed, especially when the entire heating system is designed for a different mode. But such good old technology is often used to stop the freezing of the soil, and not to warm the roots of plants. To do this, follow these instructions:
- In the fall, after harvesting, select soil 1.5 meters.
- Fill it with a compost layer of grass and horse manure.
- Add chopped straw and husks from cereals - to make the earth loose.
- After that, you can safely lay metal-plastic pipes for heating - they will not freeze even when high humidity soil in winter.
All laid biomass will warm the soil well in winter and will serve as some fertilizer at the same time.
Council number 2. in such a greenhouse it is better to do it with the help of a sprinkling system, and - attention! - only warm water. Drip, on the other hand, can end in failure if you have not protected the soil from freezing in any way, so do not risk it.
Council number 3. It is advisable to make a small vestibule in such a greenhouse - this is not only a place to store the necessary tools, but also an excellent “heat pocket” that will protect plants from extreme cold.
Council number 4. Take polycarbonate for a winter greenhouse at least 10-16 mm thick, and if you have already purchased a thin one, then lay it in a thermos in two layers. Please also close attention for sealing.
Council number 5. Especially dangerous in winter are sharp transitions from daytime to nighttime temperatures. And therefore, despite the thoughtful heating, always use water containers for this purpose - during the day they will accumulate solar energy, and at night they will gradually give it away, thus smoothing out sharp transitions in the evenings and mornings.
And finally, do not be afraid to build a high winter greenhouse - it is not much more expensive to heat it, but the benefits are worth it: excellent microclimate, optimal humidity and ease of use.
The construction of a winter greenhouse on a personal plot is a certain milestone in the practice of a gardener, when knowledge and experience in growing a variety of crops allow you to harvest not only in summer time of the year. However, you need to understand that the construction of a winter greenhouse is an event that requires knowledge, skills in work, careful preparation of materials and a place for the future building. Therefore, it will not be superfluous to familiarize yourself with some options for winter greenhouse projects and useful tips from specialists who make this difficult, but very exciting activity as easy as possible.
Decide on the type of building
To date, there are so many known variety of options construction of winter greenhouses, that in order to carefully describe the features and advantages of each of them, it would be necessary to write a multi-volume essay. Therefore, in order to ordinary person it was easier to understand the features of the construction of winter greenhouses, we note the most important differences between the main types of these structures.
The classic version of the construction of winter greenhouses has the following difference parameters.
Functional Features
in greenhouses winter type grow a wide variety of crops. It can be not only traditional vegetables, fruits, flowers and mushrooms. It will be quite interesting to harvest exotic fruits and citrus crops in winter. It is on what is planned to be grown in a greenhouse that the sequence during construction and arrangement will depend inner space greenhouse.

Building location
The construction of winter heated greenhouses is divided into three types: built into the soil, built according to the ground level, mounted on specially equipped hills (for example, the roof of a garage or a barn).

Choice of building materials
Depending on the type of building materials used. All winter greenhouses can be divided into several groups:
- built of brick;
- built from wood;
- mounted from a metal or PVC profile;
- glazed or sheathed with polycarbonate;
- combined options.

Features of planting
The construction of a winter greenhouse should take place in such a place that the future building is under direct lines for most of the day. sunbeams. After all, they are so necessary for the normal growth and development of plants. Also, a good location for the construction of a greenhouse will help save a fairly large amount. Money, which would have to be spent on additional lighting. Best Location for the construction of a greenhouse - from west to east. It is this approach that allows us to make the most of beneficial features so meager in the bright light of the winter sun.
Advice ! You should not place future greenhouses in the lowlands with a sufficiently high level ground water. In such greenhouses, as a rule, keeps high level humidity, which can be detrimental to a large number of plants.

Choose the type of heating
Properly selected and properly installed heating in a winter greenhouse is the key to creating a favorable microclimate for the successful growth and development of plants. Installation of a heating system is a rather time-consuming and complex procedure, so its implementation must be approached with skill.
A fairly large number of ways to heat a winter greenhouse are known. Each has both positive and negative characteristics. When choosing a heating system for your greenhouse, be sure to consider technological features specific building, climatic conditions the area in which the greenhouse is located, as well as the amount of cash available.

Let us consider in more detail the most common options for heating in greenhouses:
The choice of material for the construction of a winter greenhouse
Materials for covering the greenhouse are selected according to the following criteria:
- individual design features of the winter greenhouse;
- good transmission of sunlight;
- weather resistance;
- the ability to maintain structure and integrity even with frequent temperature changes;
- ease and simplicity of installation;
- low cost;
- duration of operation.
Let us consider in more detail the most common options for the construction of winter greenhouses.
Glass
This material was previously used as the main type of coating for a greenhouse. Glass goes well with wood and metal. Glass surfaces are characterized by good light transmission and thermal insulation properties. However, today, glass as a coating for greenhouses is losing its relevance. A large number of more modern, light, resistant to mechanical damage and, most importantly, inexpensive materials have appeared.

Polymer materials
This material is lightweight and has good sunlight transmission. However, polymer panels very quickly lose their original appearance and in the absence of ventilation indoors, excess moisture forms on the surface of the greenhouse.
Cellular polycarbonate
This material is the best today for sheathing the construction of a winter greenhouse. He managed to combine best qualities glass and films.

We design a greenhouse
After the materials for construction are selected and the dimensions of the structure are indicated, you can begin to develop a project for the future greenhouse. The easiest way to solve the problem is to use ready plan adjust it according to personal preferences and building conditions.
If you decide to draw up a plan for a future greenhouse on your own, you should adhere to a certain algorithm of actions:
- we schematically designate the site plan and determine the location of the future structure;
- calculate the size of the winter greenhouse.
- we develop a scheme for laying engineering communications;
- we separately designate the type and dimensions of the foundation on the plan;
- we calculate the required amount of materials for the construction of the roof of the winter greenhouse;
- think over ways of fixing all structural elements together.

Building a polycarbonate greenhouse
Polycarbonate is the best material for the construction of winter greenhouses.
The list of advantages is quite wide:
- provides good throughput and scattering of sunlight;
- has a high rate of heat preservation indoors;
- the lightness, flexibility and strength of the material makes it possible to build a greenhouse very quickly, which can perform its main functions for a long time.
It is quite possible to build a winter polycarbonate greenhouse with your own hands. Location future construction determined according to the basic rules for arranging greenhouses.

Laying the foundation
In order to lay the foundation for a future greenhouse, you can use the most diverse construction material: timber, stone, brick. As practice shows, for winter greenhouses best view foundation is tape.
The sequence of work laying the foundation:
- It is necessary to designate on the ground the parameters of the future construction.
- Dig a trench according to the markings. The depth of the ditch should not exceed 50 cm, and the width -20 cm.
- On the side walls of the trench, formwork made of wooden panels is mounted.
- The bottom of the trench is lined with sand, the layer of which does not exceed 30 cm.
- The prepared concrete mix is being poured.
Advice ! To strengthen the structure, it is necessary to reinforce the concrete screed.

We are building a frame
After the foundation is completely frozen, the frame construction phase begins.
Along the perimeter of the foundation, profiles are vertically fastened, which, to reinforce the structure, are connected by stiffening ribs.

The finished frame of the winter greenhouse is sheathed with polycarbonate sheets. They are very easy to cut with a saw or a jigsaw. The panels are attached to the profile with self-tapping screws.
Important ! In order not to violate the thermal insulation and tightness of the structure, all joints and joints of materials must be treated with perforated self-adhesive tape.
To create a healthy microclimate inside the greenhouse and prevent condensation, do not forget about the arrangement of vents, windows and doors.
Conclusion
Building a winter greenhouse with your own hands is a difficult task, but quite real for someone who approaches the matter responsibly and seriously. All it takes is some effort and a certain amount of time to have fresh vegetables and fruits on your table all year round.
How to build a stove for heating a winter greenhouse, we will learn in the next video