Ceiling cover board. How to rinse the ceiling with different types of materials. Making the flooring ceiling
The concept of the draft ceiling is denoted by the design element, usually an inter-storey overlap, laid by builders when building a building.
Of course, the option of such a ceiling differs depending on the type of structure. In particular, in brick houses this function is performed concrete plateswhich, when finishing, require only applying a decorative layer.
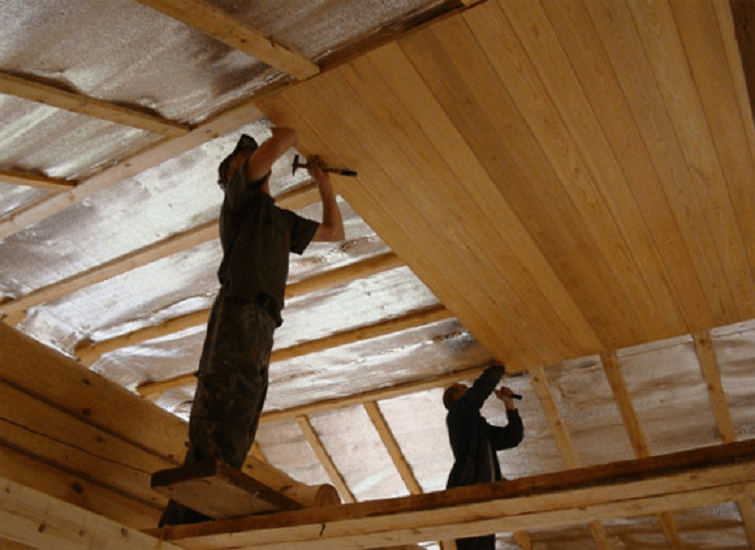
Design wooden houses It looks somewhat more complicated. Here we are littered with a rough ceiling on wooden beams, often using the boards. Work is simple and quite feasible.
Design features
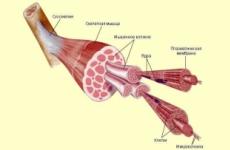
Before dealing with the arrangement of inter-storey floors, it is necessary to understand the general principle of building these elements of the building. In general terms, the ceiling in wooden house It is a multi-layered structure, where each layer performs a specific function.
It looks like this:
- rough ceiling serves as the basis for the rest building materials, manufactured from boards or wood plates, plywood, exposed to finishing finish;
- waterproofing is designed to protect wood from the impact of a wet environment;
- the insulation is obligatory in cases where the unheated premises will be located on top, helps prevent heat loss from the living rooms, helps to reduce heating costs in winter;
- parosolation makes Pie inter-storey overlap breathing, prevents the formation of condensate on internal surfaces;
- paul can be equipped in rough variant for subsequent finishes if attic room It will be non-residential, left in its original form.
The number of layers may vary depending on the purpose and climatic features of the region. In any case, this design holds on transverse lags is complemented by cranial beams.
Preparatory stage
In most cases, the foundation for inter-storey floors in wooden houses are beams. They are installed by the ends on bearing elements Constructions, easily succumb to additional processing. In addition, such a base can do not only reference, but also a decorative function. In particular, if the ceiling under the wooden beams are performed from above, the bar becomes part of the indoor decor.
If we talk about tools that may be required when performing work, they are prepared according to the list:
- electrolovik;
- screwdriver;
- drill with a set of rolled wood;
- a hammer;
- fastening elements (corners, selflessness, nails);
- stapler;
- pencil;
- roulette and construction level.
In addition, gloves and safety glasses will be required. If the insulation is assumed to use mineral wool, it makes sense to take care of the respirator.
Materials for the binder of the draft ceiling
You can stencil with a rough ceiling by various building materials, but here you need to take into account the specifics of the use of the room.
Plasterboard. This is one of the most popular and demanded materials for the construction market. GLK draws attention to his practicality and affordable priceHowever, sheets are very sensitive to a wet environment, therefore, if we are talking about raw and unheated premises, you need to choose a material with moisture-resistant coating. Plasterboard is installed on a frame of metal-powered or glued directly to the base.
PVC panels. Universal material that organically fits into any interior. The advantage of plastic is its neutrality to any external environmentIn addition, due to a short weight, it does not create additional load on the supporting structures and the base. The only drawback: low resistance to mechanical damage, but, given the fact that we are talking about finishing the ceiling, you can not focus on this nuance. Mounted panels stapler on the prepared frame or glued liquid nails. The second option is applied in cases where the base forms perfectly smooth surface.
Lining. Beautiful, but relatively expensive method of trimming a rough ceiling. Reiki can be installed on the basis or pre-prepared framework. For fastening, self-tapping screws or fine nails without hats are used.
MDF. Plastic panelswhich finely imitate natural coating: stone, plaster, wood. Given that the material has an artificial origin, it can be used even in rooms with elevated humidity, such as kitchens or baths. MDF panels are attached to a frame using curvators (special fixing brackets), which reliably press the edge of the panel to the base.
Plywood. Inexpensive and practical finishing material, which, after installation, forms a practically perfectly smooth surface, which will noticeably simplifies the process of finishing finish. So that the plywood served for a long time, it is pre-treated with antiseptic compositions.
Board. A fairly common variant of the black ceiling binder. As in the previous case, the building material is processed by an antiseptic, the evenness of the sides of a special role does not play here: the surface will be closed with the finish coating.
When choosing a material you need to be guided not only worth, but also technical characteristics. For example, any products made of plastic, PVC and MDF, possess low thermal insulation propertiesTherefore, when installing, the thick layer of the insulation will be required. Plasterboard swells with prolonged exposure of moisture, and even water-repellent coating is not able to solve this problem. Wood boards coniferous rocks It is not suitable for banging a rough ceiling in the baths: when heated, the sawnaterial will highlight the resin, which is not very good in terms of fire safety.
Black Ceiling Ceiling
A rough ceiling from the board is one of the most common options for the original finish. The attractiveness of using sawn timber is that they do not require preparatory work And they can be nailed directly to the beams of overlapping.
Ideally, sawn timber should be located closely, while maintaining the minimum distance. This will make it possible to create a reliable basis that, if necessary, can withstand even severe plaster or stucco. If this option looks costly, the elements of the sheath can be attached while maintaining the interval of 30-40 cm.
If the beams of overlappings are scheduled as decorative design, the boards are nailed from below, but from above. In this case, you can do without additional finishes. This will require a smooth lumber, which will be laid, without gaps. After that, the finished ceiling is covered with several layers of varnish to emphasize the natural beauty and wood texture.
If working alone
A good assistant is difficult to find, so sometimes the builder has a question of how to smoke the ceiling by boards. In general, the principle of the binder of the draft ceiling remains unchanged, but here you will have to choose the building materials more picky. In particular, working alone, it is better to give preference to lightweight materials that can be easily held independently, such as PVC panels or MDF. If the board is supposed to be a board, then the sawn timber is better stacked over the beams of inter-storey floors.
It is noteworthy that it is possible to mount boards to the bottom, but here you will have to use homemade struts that will support one end of the board, replacing the missing helper. You can also apply various hooks to which one end of the board is suspended.
Plywood Bar Ceiling
Here work will be performed in a somewhat different principle. In particular, plywood has low load stability. If the sheets simply fasten between the beams, they are guaranteed to burst, damaging the finish coating.
Therefore, the plywood stitch is performed according to the following scheme:
- the waterproofing membrane is attached to beams or lags;
- top made frame from wooden bar small cross section;
- then the installation of plywood is performed.
Considering that the installation is assumed to be a frame base, it will not be possible to glue the sheets, they are screwed with self-draws or nailed with thin nails. After that, the construction of the design and finishing finish is performed.
A few words about insulation
After hanging a rough ceiling, laying is performed waterproofing film. After that, the installation of the insulation is performed. This feature can be made by ordinary sawdust or clay, which is filled with free space between beams. A good option for insulation is considered a foam, which not only provides reliable thermal insulation, but does not attract malicious insects.
On top of the insulation stacked the draft floor. At the final stage, the finish finish is performed. If the inter-fitted overlap cake is performed correctly, any materials can be used for finishing finish, the risk of damage and deformation is minimal.
The problem of choice than to strip the draft ceiling on wooden beams, always occurs in the construction of wooden log cabins, buildings of timber, frame cottages, cottages, and even attachments to the main premises. It will be necessary to choose the material and method of laying on the ceiling base so as to ensure its reliable mounting to the support lags, and any shrinking or deformation processes accompanying all structures of wood have not led to drawdown or deformation of the supporting structures.
Overlapping Materials
Wooden beams today remain a universal means to arrange the ceiling overlap, they are light and durable, relatively simply processed, they cut, drilled. In the wood you can drive any kind of fastener, for installation works and styling will not need powerful lifting equipment.
But wooden beams, like any wood, with all its advantages have two significant disadvantages:
- Bar or log, even past thorough treatment, still remain susceptible to temperature deformations, drying, shrinkage, which ultimately can lead to cliff mounting for stitching the ceiling in a wooden house;
- The plane formed by the lower edges of the wooden beams, even with the most careful alignment of the support surface of the walls, always remains uneven. Therefore, the material planned for the black ceiling stitching in a wooden house must have maximum strength.
For your information! The last item is extremely important for performing high-quality stuffing of a rough ceiling. Typically, the correct fusion of a long wooden slaughter, plate OSB Or plywood allows dramatically to enhance the stiffness of the structure.
The most difficult is the situation with large premises. The problem, how to make a draft ceiling in a private house on wooden lengthening beams, is always exacerbated by the fact that the carrying wooden logs or dual boards under their own weight, mass of the insulation and attic furniture always bend.

Therefore, it is important not only to choose the right thing, the better to adhere the ceiling in a private house, and and choose the method of fastening the bodies on the beams. Ideally, the material should be laid in such a way as to compensate for any deflection. rough overlap Or at least make them invisible.

Materials for laying on wooden beams
To binder a draft ceiling, use several most accessible and easy-to-process materials:
- Edged board with a thickness of 20-25 mm with a polished and raw surface;
- OSB plates with a non-aluminated surface;
- Plywood canvas;
- Old laminate.
All listed materials are made on the basis of wood-chip mass, which after deep processing Using pressure and chemical reagents still retains the thermal expansion coefficient within the characteristics of the construction wood.
Plasterboard sheets with all their advantages are not suitable for fastening directly on wooden beams of rough overlap. Need a transient frame.

In this case, in order to equip the draft ceiling of drywall on ceiling bars, it will be necessary to install metal carcass From a thin profile.

There are many alternatives of materials. Before you need to ride the ceiling base in a private house, expensive plywood or clapboard, you can use an old wooden rail from the facade of the building or even trimming facing panels.
The old dismantled laminate can be as a cumulative material for a draft ceiling. Usually owners throw it out or used for flooring in the most unexpected places. The lamella treated with oil varnish can solve the problem of choice than to sew the ceiling on beams in a small room.
Drawling of the black ceiling under wooden beams
The most suitable case of the binder has to choose, based on the characteristics of the building, the method of its insulation, the presence of a warm or cold attic room, the material of the walls, the humidity of the atmosphere inside the box.
An ideal variant of the draft ceiling may well be considered a removal of wooden beams of overlapping by a conventional sledge or edged board.
There are three most proven ways of flooring:
- Fastening a long boards on the lower ends of the draft overlap;
- Installing boards on cranial boots;
- Flooring along the outer surface of wooden beams.
At first glance, the variants of materials differ little, but it is not quite so, there are certain differences. Before you rinse the draft ceiling on the beams, you need to pay attention to the device attic and overlap.
Wooden railway flooring on the upper plane of the bar is used only in case of serious need to increase the height of the ceiling overlap or arrangement of attic space winter type. In this case, to reduce losses, the floor is insulated with an additional layer of mineral wool above the draft wooden beams. Takeaway Lag from the insulation layer reduces heat loss and significantly improves vaporizolation.
Classic Option Ceiling Bearing on Wooden Beams
On roughing coatings, tank boards are rarely taken due to the high price. In the simplest case, the cutting board is used to binder. But there are exceptions in frame buildings rough ceilings can hem wooden clapboard or sex board.
The chalet is cut in size, stitched on the length of the overlap and polished along the wrong and front parts. Such an option is cheaper than if you purchase edged or, especially, the tank board. At first glance, the material that goes on the arrangement of the draft ceiling is not necessarily grinding or processing on a foam. In fact, the removal of a coarse pile from the wooden surface remaining after cutting, significantly reduces the flow rate of antiseptic impregnates and flames.
If the distance between the bars does not exceed 60 cm, then the board can be beaten right on a wooden beam. In this case, the material should be laid on the draft ceiling perpendicular to the direction of laying overlap. If the room is quite large, and the step between bars more than a meter, then you will need to put additional crate From the risen inch, to reduce the distance of up to 40 cm.
The only problem with which you have to face with the arrangement of the draft ceiling is associated with the complexity of holding the board on the wooden beams on the elongated hands. If you have to work alone, in this case there are stopped forests, homemade wooden backups or joinery clamps come to the rescue. The stacked board is gently pressed to remove the gap, and fasten with self-draws and a screwdriver.
In the same way, a rough ceiling of a tipped flooring or wooden clapboard is collected.

Advantage of black ceiling binder on cranial bars
You can also make the ceiling surface binder using cranial wooden bars. These are wooden rails with a cross section of 40x40 mm, beaten on both sides of a bar along its entire length. Rough ceiling is recruited from short wooden planks Or cropping boards, laid on cranial supports along the entire length of the overlap.
There has its advantages to such a footer:
- The styling of the material can be performed on their own, without helpers, while the employee is directly at the overlap by the attic, so much more convenient to lay the hearing material than to lift it on the elongated hands above his head;
- A set of ceiling is much simply option Handling long boards for the entire length of the overlap. You can always remove one or two planks, in order to check the condition of the insulation or pave additional communications.

The technology of styling a rough ceiling on the cranial bars has their own, quite serious disadvantages. First, the dimensions of the reference rack-bar must be at least 40x40 mm, otherwise the heating weight simply produces it. Secondly, the thickness of the black ceiling insulation is reduced to the height of the support. Otherwise, the surface of the overlap will need to be raised on the same 40 mm.

Thirdly, the horizontal size between wooden beams is automatically reduced by 80 mm, which leads to a worsening of the permeability of vapors, most of which are not deleted through ventilation clearanceAnd will linger on the draft ceiling.
Another factor, short boards do not affect the strength and rigidity of the rough ceiling overlap. And vice versa, the long-term fusion improves significantly carrying ability Bruus, so highly elongated ceilings are recommended to sew without the use of cranial supports.
Paving plywood, osb and fiberboard
Of the three materials used to cover the draft ceilings, the weaker is the fiber-fiber plate, but at the same time, thanks to a small weight, it is possible to install or lay on wooden beams alone, without helpers.

Ceiling from the fiberboard
Fiber material binder is used as a rough base before installing stretch ceiling membranes, pastiles foam flaggy tile, stucco, any species decorative finishWith a slight weight.
If wooden beams made of trees logs are laid on the walls, then, before collecting the draft ceiling, you need to fill the crate of thin dequenions with a cross section of 20x60 mm. If we fix the fiber-sheet cloth directly on the uneven surface of the log, the surface will be curve and uneven.

Filter wooden beam pad
To arrange a draft ceiling, a plywood is used to 10 mm thick. The material can be laid in an arbitrary order, directly on the bars, without any crate or intermediate rail.
If the ceiling surface is further subjected to trim, stain or tinted under the lining of a wooden array, the joints and seams between the coatings are close to special paste cooked from the painted birch chips and oil varnish.
Before laying the material, the seams and edges are sealed with scotch, so that the lacquer does not hit the front side, otherwise stains and divorces will remain on the plywood due to bad toner absorption.

Using OSB Plates
The arrangement of the fusion layer on wooden beams using OSB plates is rightly considered one of the most optimal variants of the black ceiling binder. The cost of a plate, a thickness of 10 mm, is about twice the price of Phaneur, despite the fact that the strength of the OSB is enough to keep the layer of the insulation, and when right fastening, not less than five screws for every 20 cm of the length of the wooden beam, the panel can withstand weight up to 100 kg per square meter.
Conclusion
The technology of styling the draft ceiling on wooden beams in terms of complexity is available to all novice finishes. Everyone who has ever dealt with the installation of rails and boards, without resorting to the services of hired workers. Of course, before proceeding with the equipment of the draft ceiling, it will be correct to consider all the performance technology, especially in terms of the transfer of the overlap material and its temporary deduction to full fixation.
After the construction of a wooden house from a bar, it is necessary to deal with this situation - I want to see a reliable draft base from above, instead of wooden beams for the incarnation of conceived design, installation of decor and spectacular interior. To cover the ceiling, I did not have to hire masters, it is enough to fulfill the generally accepted rules to make a wooden ceiling with your own hands reliable for many years.
Wooden beams are used mainly in private houses, in apartments - concrete floors. But it is quite possible to make a beam design with the overhaul of the roof on the last floor, it is better than the creation of a concrete partition.
Wooden beams are used mainly in private houses.
Preliminary preparation
We will need:
- Ladder;
- Building kids;
- Selflessness, screwdriver;
- Trying material, heat and vaporizolation;
- Construction level, stationery knife;
- Antiseptic, construction glue, fire prevention.

Antiseptic
At first, I inspect the beams for the presence of defects: cracks, chips, curvature, mold, smearing the cracks with putty, suspicious places clean, processing the antiseptic, primer, after which they can be painted if you need to do once and for centuries.
The draft base together with beams can be treated with an antiseptic with the addition of a teaspoon of construction universal glue, so that the mixture does not drip and created a stronger film.
Chernovaya ceiling finish
There are many durable materials For the device of the binder of the draft ceiling, the incarnation of the conceived interior, the special design of the room, even without facing, under the antique. Depending on the purpose of the interior of the room, decoration is selected, decor.

Barbell ceiling
For example, for rough repair, interior, when designing design, the decor in the bath can not be used by the following elements:
- Various wooden ceiling panels: chipboard, fiberboard, plywood, because with high humidity they will deform.
- Plastic, they can be separated by a draft base, a ceiling under a tree and ancient, emphasize the design even without facing the trim, but it has bad thermal insulation properties, condensate will form, and then mold on trim.
- Timber containing resins that will drip down when heated. It can be a rake and MDF, it is important to clarify before purchasing.
Mounting board
She happens to be reliable foundation For the incarnation of conceived design. The design of the processed boards by either narrower slats, clapboard, which even without facing is able to emphasize any design, especially under the old days.
Boards are attached at a distance of no more than 30-40 cm from each other - if we do not have enough money. Ideally - online with minimal gaps between each other. Also, if the wooden ceiling will be placed heavy clay with a decor under ancient, it is necessary to connect the rails not on one beam, and in a checkerboard, if the facing decoration is clapboard, plates, plasterboard - then you can save a lot of time consolidating all the rails on one beam .

The design of the processed boards or narrower rates
There is one method for a high-quality device of a draft ceiling, which I really like: boards (inches, 25 mm) are not trimmed along the length (6 m), do not serve through the window, doors, and outside, under lags, on the side of the building, all the rails immediately . For this, there are enough two people, you need to make it so that the distance between the wall and the beam lying on it was 5 cm, also the boards with each other, I fix the metal plate. Under their Mauerlat (Wooden Rake, for the convenience of the construction), under it - Ruberoid strips, from three sides, the 4th side is needed to supply wooden slats and materials, I install the last beam with Mauerlat on this side at the end.

Boxes in a private house
Subtleties at the initial decoration of the board
Consider the main subtleties of work, allowing to make a draft base and a wooden ceiling much faster and save a lot of timber.
It is important that the board will be for the entire length of the room, lay down on the walls, which is very convenient, there is no need to equal, cut a lot of boards, actually no small waste. All rails immediately at the entire length are set outside on the wall, then fed by one person, and the second settles them from the inside of the building on another wall.

Ceiling board
After the material is filed, is then mounted by self-drawing to beams. It should be replaced that even the 2-screws are enough to hold a person on a blackboard from above, which simplifies the assembly and speeds up the work when applying and their amendment. If the length is much more necessary, then the rakes are not attached to the last beam, if less is cut off on the latter beam with an electroll bison along all length, taking into account that on the beam it was possible to fix the rails on the other side.
The missing length is easy to eliminate the same method - the supply of all the material, fixing on the lags, the remaining speaking length is also cut off by an electroll bison, pre-put a smoothly long rail to the material so that the slice was smooth.

Rough ceiling do it yourself
Finishing ending
The device of our design is that a small slot remains from the edge, for which you cut off the necessary width of the entire length out of an incision, then mount it to beams. Then we have one side with which we have served a timber.
Ruberoids, Mauerlat, remind you to the Ruberoid strips, remind you that we have no timber from the edge, in connection with which the boards can be bent up, for which they are not nourished to the extreme available beam. After the assembly, they are nailed to Mauerlat, and nailed to Brus.

When performing work, do not forget about security
When performing finishing works, it is extremely important not to forget that the wooden ceiling is still not screwed, the bars are not screwed to the edge, it is necessary to be on the walls and in the locations of the beams, to avoid injuries.
There are also exist MDF platesthey are a reliable support for the embodiment of designer masterpieces, and finishes. The assembly is carried out much faster than the board. But the ceiling of wooden plates wins against MDF plates, because the remnants will accurately go to the frame for the binder. Not to mention the high price of MDF, therefore the plates lose, but the rough assembly occurs faster, which is a significant plus.

Upholstery of wooden ceiling
Hydro and vaporizole assembly
To begin with, it should be declared for what the room will be used if one more heated room will be used, then there is no point in the device heat and noise insulation on the draft ceiling, the wooden surfaces spread quite well noise and heat.
Steam barrier is mounted throughout the perimeter of the ceiling, it takes particularly well in the corners, falls down with the allen, the boards are mounted over the overlap. This will help protect the rough base and a wooden ceiling from rotting and mold.

Parosolation of the ceiling - efficiently and efficiently
Subtleties laying insulation
For incorrect laying Insulation It is possible to destroy the plinths and decorations, a rough ceiling even the emergence of a fire, for which it should be slowly learning the instructions, so as not to confuse the parties, because the labels of different firms can contradict each other.
Important! If not planned dropped ceilings, and the distance from point lamps to the draft ceiling will be less than 5 cm, then when assembling insulation, it is necessary to know in advance the places of fastening of the lamps, since the insulation can light up on temperature.
It is enough to cut in the material circles about 20 cm, around the planned lamp, it will create a good fire safetythat is extremely important for a wooden house, and wooden elements Decor. It is important to install these places even during the installation of the material - measuring from the wall of the place, then put the label from above, in the form of a circle with a diameter of 20 cm.

Comprehensive thermal insulation reduces energy projects
The same applies to vapor barrier, although the material is quite durable, but unstable to high temperatures, it can melt and lead to a fire, especially if the rough, facing decoration and decor are made untreated with lining. Thus, the underlined design can lead to the sad consequences for the interior and the integrity of the room.
But since the lamps and decor are mounted not to the rough ceiling, like the wiring, it is enough to be lower, in the places of fastening, install heat-reflecting foil on steam barrier, 20 per 20 cm squares. It will not be seen, but it will help save the interior of the room, and not damage the intended Design with decor.

Installation of thermal insulation in a wooden ceiling
As we see a wooden ceiling with your own hands it is possible to do quickly and efficiently. In addition, it is possible to strip the draft base yourself, faster, better than many workers.
After the long-awaited dwelling from the wood is built, it remains to perform finishing works inside and outside the house. Most often with special care is chosen interior decoration. However, before the device of the finish finish, it is necessary to properly arrange the main elements of the building of the building, to which the rough ceiling on wooden beams belongs.
Features
The base of the draft ceiling, first of all, should be reliably fixed. For the arrangement of rough design you can use different materials, excluding plastic, chipboard, plywood lists and materials containing resin.
It is not difficult to arrange a draft ceiling with your own hands: this will require only attentiveness, elementary skills to work with the tree and the necessary tools.
How to choose the case for a rough ceiling
A rough ceiling arch in the wood house is an integral part of the design, forming the surface of the overlap, which is the ceiling base. It is subsequently mounted finishing finish. The rough base is formed with the help of ceiling boards stacked overlap beams.
You can use the basis using the most different methods, as wooden beams can coexist with a variety of materials.
The ceilings with wooden floors are often suitable in wooden dwellings - in them the tree overlap rushes the most harmoniously. In addition, structural beams are often used as an element of decor, highlighting them, for example, contrasting color.
To binder rough base, a trim board is often used, which has high functional and aesthetic characteristics. A little less often meets the finish with the help of a stream board - such an option will definitely make a comma in the interior, besides, a natural tree has its own unique aroma - it contributes to the dwelling part of the nature into the atmosphere.
It is quite simple to enter the basis - you can cope with the help of masters, and, with due effort, with your own hands. Before the binder is necessarily insulating. The most popular view of the insulation for ceilings is mineral wool. It should be remembered that the insulation layer necessarily needs a waterproofing layer - otherwise the insulation will quickly lose its functional properties.

In order to strip the draft ceiling, you must select a material that meets the following parameters:
- High moisture resistance;
- Resistance to negative temperatures (if the dwelling will be operated on season);
- Resistance to temperature jumps.
To cover the base in rooms with high humidity, the panels of plastic are most suitable, as they repel moisture, are not susceptible to rotting and resistant to condensate.
The most common way of binder ceiling base - Boards. Less popular plasterboard, besides, it is not used on loggias, terraces and in front of the arbor. Carefully use drywall sheets needed in rooms with elevated moisture levels - in this case it is better to choose varieties that have resistance to moisture.
Before mounting GLCs, it is necessary to build a special metal frame, which will later be attached to the sheets. Gypsum coaster capable of removing all irregularities and defects of the foundation, but it is not recommended to produce such a finish for 2 years from the end of the construction of the dwelling, since the house often gives shrinkage, and the plates may not behave in an unpredictable way.
Plastic stitching of a rough ceiling on wooden beams is an easy and convenient material in mounting. Among other things, plastic liner has big choice in terms of decorative properties. Long service life is another indisputable advantage of plastic. Gap between finish finish The ceiling and walls can be masked with special ceiling moldings.
Ceiling Ceiling Device

If you plan to arrange a draft ceiling with your own hands, you must first take care of the availability of all required tools. This also includes an antiseptic composition for wood processing, construction glue, a composition containing anti-epires, material for finishing sheath, etc.
When it is necessary to choose the beams of overlapping for the base, it is necessary to thoroughly check the raw materials for defects, mold and fungus. If defects or mold are detected after purchase, it is necessary to treat wood with antiseptic solution, and chip and cracks to sharpen.
In the wooden house of the draft ceiling, it is possible to make it even on your own. For its arrangement, the following stages of installation work should be carried out:
- First of all, it is necessary to close the beam structures from the side of the room with a parchment or polyethylene film to create a vapor insulating layer. Material fixation can be carried out using construction stapler;
- After the first step of the beam, it is necessary to be used in any material that is suitable for such a goal. Often, a cutting board is used for the beam;
- Next, the insulating layer is laid between the bearing beams, which will prevent heat removal from the room. Most often, the foam, ceramzite or mineral wool serves as such material;
- After laying the insulation layer, you must once again put a layer of vaporizolation. There are many varieties of materials for such purposes, and polyethylene is most popular. However, it should be noted that membrane vaporizolations coped with their task much better, besides, they do not interfere with the natural air exchange.
- The final stage of the arrangement of the draft base is a device of lag on the beams of overlapping, to which the draft floor will later be elected.
It should be paid to the fact that the formation of draft overlap should be made, given the appointment of the attic, since there are some constructive differences when arranging residential attic and non-residential space:
 For a attic that is not planned to make a residential premises, it is worth adding aluminum foil to the layer of overlap - this method will reduce the heat loss in the house. Waterproofing for cold variety attic is mandatory. It can be performed using conventional polyethylene;
When arranging the residential attic in the draft floor layer is added gasket for sound insulation. Material usually serves mineral wool or sawdust.
An important point - the black ceiling binder boards are fixed on lags with long nails, which are clogged into space. Boards are worth putting close to each other without leaving big gaps.
Final characteristics
The ceiling condition has a direct connection with the microclimate of the room. Aesthetics finish coat The ceiling directly depends on the arrangement of the draft base. If it is completed correctly, the room will be cozy and warm due to good heat and sound insulation. At the same time not less important Plays a vapor insulation layer - it helps to maintain the quality of thermal insulation, which directly affects the operational characteristics of the entire dwelling as a whole.
Video: Black Ceiling
derevostroika.ru.
How to make a ceiling in a bath: bevel, flooring, panel
In the bath traditionally everything, or almost everyone is trying to make a tree. It is clear: beautiful, natural, useful for health, creates an excellent atmosphere. And the ceilings in the bath are also made of wood. Someone from the edged or tipped board, someone out of the lining. But mostly from wood.
Designs of wooden ceilings
The ceiling of boards and lining can be made in three ways. All of them have their own characteristics, dignity and disadvantages. About each of them a little more.
Stitched ceilings
The most reliable, but, unfortunately, the checked version is the tail ceilings. The fact is that the laying of beams of overlapping is needed for their device: thick bars or trimmed logs. And they are not suiced. They laid them on the upper crown or fasten in the wall - depends on the type of the chosen roof. The ceiling boards are then nailed to the beams.

The ceiling - blackboard or lining nailed to the beams of overlapping
The design is reliable. It can be freely moved to it, which can be useful when repairing or preventing the roof, chimney pipe and a rafter system. It is convenient to do heat on such a ceiling, steam-hydraulic insulation: you can walk as much as you need.
The lack of them are as follows: the installation of powerful bars or logs is required, which significantly increases the cost of construction. But if you do the ceiling with your own hands, you will not need to pay a brigade.
Panel ceilings
For the manufacture of panel ceilings, the shields consisting of two longitudinal support bars and the transverse slats stuffed on them are pre-collected. Then, all the necessary layers of insulation pie and vaporizolation are stacked inside. AND finished design Fastened to the walls.
Such panels can fit between overlapping beams or serve the basis. In the second version, the bars for the manufacture of panels use powerful: they must withstand the weight of the insulation and the binder boards. The panels on the top edge of the wall are based, are nailed with long nails, then connected with beams (if any) or with each other.

One of the panel ceiling options
The width of such panel panels is small, which allows the use of short boards that could remain from the walls of the walls. You can also buy a lumber of substandard length, which will also save.
The disadvantage of panel ceilings is the considerable weight of each shield. Even if the insulation and all the other layers are fixed on the spot - on the ceiling, set alone this design is impossible. You need to work together, and better - threesome.
Flooring ceilings
This species can be implemented only if the length of the span is from one carrier wall to another - no more than 2.5 m. In this case, the boards are attached to two opposite walls. All materials of insulation and waterproofing are stacked from above, on the side of the attic. Everything is very simple and inexpensive: such a ceiling in the bath can be made with your own hands alone.

The flooring ceilings are made when the distance between carriage walls no more than 2.5 meters
The lack of this option is the impossibility of walking on the floor. Even the flooring of the insulation cake can end only damage to the manufacturer of the ceiling. The same results will lead any other job. So this option is though economical, but impractical.
Do the ceiling with your own hands
Know the features of the design does not hurt, even if you hire a brigade of builders: it is better to control every step. So there will be a guarantee of what will make you normally. Well, if you decide to make a ceiling in the bath with your own hands, then before you begin to make a matter, you need to thoroughly know what, what to do and why.
How to make a panel ceiling
First make shields. Do it on a flat site. Since the length of the shield is rather big - from one wall of the room, to another, they usually work on Earth. But you need to find a flat platform or lay a large sheet of plywood, OSB, etc.

Panel ceiling option with decorative beams
Dimensions of panels
If there is no beam overlap, then the width of one panel is 60 cm. If the beams are installed and it is decided to do not be used, but the panel ceiling, then the width is selected depending on the steps of the beam installation. If the distance is less than the meter, then you can do one panel, if more - do two.
The cross section of bars also depends on wheneting beams, or not. If there is no beam, minimum size Bruus - 100 * 150 mm. Length of bars - the distance from one wall to the other, plus the value of the wall of the walls is 10 cm.
Manufacturing shields
Work we describe for the case when there is no beam overlap. If they are, usually make a stevy ceiling. Two supporting bars are stacked at a distance of 50 cm, rest them in a flat bar. Over the entire length, verify the correctness of the distance. Alcright bars are stuffed with 60 cm boards, leaving 5 cm of free edge on each side. So the gap is formed, which is filled with the heat insulator after installation.
First make panels, linse them with vapor barrier, then strengthen on the walls
For the crossbar uses a lining or a circulating board. As an option - a cutting board with a chosen quarter. All materials must pass antibacterial processing. It is also desirable to impregnate with antipirens.
Carnat strips can be found or in the ramp - through, or a secret way - in the spike or in the groove. Fastening in the crying is the most reliable. And in order to disguise the hats of nails, they are interinted in wood with the help of Dobochnik. The holes are then put off, and after drying, everyone compares sandpaper with small grain. If the color of the putty is correctly selected, almost nothing can be seen.
So that the putty does not differ in color and structure from wood, to the finished composition mix the wood dust, which was formed when working with boards. Such a putty is almost not visible even from close range, and on the ceiling does not attract attention at all.

Disguise the hats of self-tapping screws or nails can be masked on a tree
Film of vaporizolation is fixed on the shot panel. It lines over the entire surface, with a clock at the bar. Fucking or small carnations or brackets from a construction stiplator.
Before you start lifting the panel, set several slosins that fix the shield in the correct position. At the end of the installation, oblique bars are dismantled.
Installation and fastening
On the top crown of the walls laid the jute tape. It will serve as a heat and hydraulic insulator, as well as warp wood friction in advance. The panel is placed on the wall, with an approach of 5-10 cm, nailed with long nails. The first shield is still fixed along the long side - through a bar to the top crown of a log or bruster. Previously between the Bru and the wall, it is necessary to pave waterproofing - twice the rolled regteroid, as well as the juncture band.

On the wall at the edge of the panel laid the jute tape
The next shield is installed close to the first. There is a gap of 10 cm between two neighboring bars - 5 cm from one and second one. This gap is covered with vapor barrier, with an approach of at least 10-15 cm on a previously nailed band. The joints of the joint are sick of scotch. Then the gap is filled with heat insulator. After which the panels are bonded among themselves. It is more convenient to do with metal spills, washers and nuts.
As a heater for a bath - not in the steam room, it is possible to use polystyrene foam, and the ceiling of the steam can be insulated with spike mats from basalt fiber or any other natural insulation - clay, for example.
If there are beam overlapping beams, the beams are attached to the beams through the bar. Long nails are usually used as fasteners. In this case, in the manufacture of shields, transverse boards must be behind the bar per distance equal to half the width of the beam, plus 5 centimeters. Also, with this method, it is important to expand the panel from the side of the room.

After installing and fixing the panels on the walls, thermal insulation is placed in them, on top of it - waterproofing
With your own hand ceiling
The ceiling liner is quite laborious work. But make it with your own hands is easy. Work starts with the installation of beams.
Overlapping beams
Their size depends on the attic will be above the room, or residential premises. In general, there are special formulas and tables for which the required parameters are selected, but for most medium-sized baths for overlapping under the attic take the timing of 100 * 200 mm, for overlapping between the floors - 100 * 250 mm. The installation step is 60 cm.

Table for determining the thickness of the beams stitching ceiling depending on the loads
Bolshoe beams are not suiced, and not always available. There is one trick that will save. They can be made of edged board good quality. For example, you need 150 * 250 mm beams. You can take three or four boards with a width of 250 mm and a total thickness of equal or a little more than 150 mm. For example, for our case, you can use three boards 50 * 250 mm. They are connected by self-drawing from two sides among themselves, and then used as beams. Self-dynamics - not less than 2/3 width of the future bar, i.e. 125 mm or so.
If the boards are scrambled (lacks length), the joints of the joint must be shifted relative to each other at least 50 cm. In the joints of the board of the board on both sides, they are fixed by at least two screws. Why not use nails? After drying, they keep worse: give greater backlash.

One of the options for fastening beams
In terms of strength, the scrambled beams are not inferior to the massif. One nuance: It is necessary to install them so that the sideways watched the boards. That is, it is impossible to make a beam 150 * 250 mm of five boards 50 * 150 mm: the side of its surface must be solid.
You can still use glued bar. This is also a stripped from individual pieces of the pushing, but only manufactured in factory conditions. In the manufacture of glued timber, wood fiber is placed in different directions, which prevents the deformation. Therefore, it differs in high reliability, it does not crack and cannot be unscrewed by the "propeller". But there are expensive bars.

Beams can be fixed and so
Installation of beams
Mount the beams on the walls. In the upper crown prepared seats under the selected size of the bars. The first and last beam should be from the wall at a distance of at least 5 cm. Accordingly, the step of the following can be slightly reduced to withstand this distance. Before laying the ends of the bars, turn the rubberoid (or dip in the molten resin). After installation, they are fixed to the crown with long nea-nailed nails, drove at an angle.
So that nails do not rust for a long time, they are boosted in Olife before use. Then in a few decades they will not be a rust trail.
Mounting beams in a steam room or washer, do not forget about the need to make a place to pass the pipe from the furnace. How to bring the pipe through the ceiling through the ceiling here.
Parosolation and doomle
After installing the frame, you can start the installation of the ceiling. First, a layer of vaporizolation is attached to the beams. This is a rather thin roll of roll type, it can be with a foil coating. It roll across the beams, fasten with the help of a bracket (so more convenient). One layer comes to another at least 5 cm. The joke is sampled by bilateral scotch. Moreover, if metallized vaporizolation was used (usually stacked in the steamings), it makes sense to use similar tape.

Parosolation is attached to the beams below. In the steam room, she is usually foil. On top of it slaughters - for best ventilation Lining on the ceiling
Further, for the best ventilation of the ceiling boards, you need to create a gap: fill on top of vapor barrier bar. Their thickness is about 2 cm, the width is 3-5 cm, but the wider, the easier it is to mount the boards (lining) on \u200b\u200bthe ceiling.
Stitching ceiling
Next comes directly to the ceiling liner. It can be chisty and cornese. Black ceiling do if then planned by other finishing materials - plasterboard, plywood, plastic, etc. But for baths such an option is rarely used. Is that to save the ceiling sometimes beched by moisture-resistant plywood.
For Chernova ceiling will suit Unedged board with remote to be treated with bugs. Such lumber are used for clean:
- Edged board with a quarter or tipped. The thickness of the board must be 12-18 mm. Lush - 18: You can walk in the attic without fears.
- Lining or Eurovand. It has a curly facial surface. Connection method - spike / groove.
It is possible to mount conventional nails, finishing (with a small hat) or self-drawing. If it is desirable to fix the caps, then the hats are desirable, and the holes are smeared with a putty on a tree.
A secret method of fastening is possible in the case of using a t-shirt or lining. In this case, nails (selflessness) are clogged (twisted) at an angle in the spike or groove. The way "in the groove" is more common, but more reliable - in the spike. Having driven a nail into a spike, capture 2/3 of the thickness of the board, and this reduces the possibility of splitting at temperature and humidity deformations.
In order not to split the board or lining if the nails are clogged into the thin edge, the hole is pre-triggered by a thin drill at the desired angle.

A secret way of fastening - nails or screws are clogged into a comb or groove
The width of the boards for the ceiling cover is not more than 10 cm. It is clear that the wider there will be a board, the faster the ceiling will be ready. But more wide boards Bashed stronger. So 9-10 cm is the optimal option.
If the boards are not enough lengths, you can smack it. But the joints should be on beams. Each end is fixed at least two nails (self-drawing). The joint can then be masked by the smelting.
After the ceiling liner is over, it is nourished around the perimeter ceiling plinth. It will hide the gap between the ceiling boards and wall decoration. From above, on the side of the attic or the second floor, the heat and hyilro-insulation is placed.
Making the flooring ceiling
This is the fastest option of the ceiling device, but the distance between carrier walls can not be more than 2.5 meters. Accordingly, the boards must have such a length. The minimum thickness of the board for the floor ceiling is 25 mm. Since other supports are missing, it is the ceiling that is the supporting structure: it accounts for the weight of insulating materials and people moving in the attic.

With the device of the floor ceiling, the board relies on both walls. Because the distance between them can not be more than 2.5 m
Boards are used or edged with a chosen quarter, or tipped. Fasten them to the walls, holding a layer of juting tape on the upper crown. The docking of the headboard can be problematic: the boards are flexing under weight. To work it easier, look for spikes is not rectangular, but conical: it goes better in the groove.
Treatment of sawn timber
Everyone knows that the wood is prone to rotting in the crude atmosphere, and also love bugs-cores. Therefore, it is impossible to use sawn timber without preprocessing. It is also desirable fire-prevention impregnation - with antipyrene compositions. But it is also clear that you don't want to use chemistry in the baths: this is a place for recovery, with which the chemistry does not "fit."
Chemistry can not be applied, but there are methods of processing methods that are no less effective. One of these is the processing of hot olifa and molten wax. For proper fulfillment This is simultaneously protection against fungi, rot and bugs.
Read more about what wood it is better to use for the ceiling in the bath in the article
baniwood.ru.
How to independently make a ceiling of boards
Recently, it becomes particularly relevant to make interior with environmentally friendly materials. But in some cases, the use of wood becomes a necessity, not the desire of the owner. The use of wooden boards for a bath is one of the most popular solutions that can be performed with your own hands. In this article we will look at how to properly detect the ceiling at home or bath with wooden boards on their own.

Major Benefits of Wooden Board
This option has been retaining its popularity for people who have decided to take a bath or home ceiling. Wooden boards for the ceiling have certain positive features:
- High level of strength. This aspect is possible only with high-quality material processing;
- Beautiful thermal insulation;
- Good sound insulation;
- Simple installation;
- Attractive appearance;
- A real tree helps to emphasize the individuality of the premises owner, confirms his good taste.
Thanks to the above features, the boards for the ceiling in the bath are used especially often.

Each type of footer has negative sides that need to be taken into account when performing work. Wooden boards for the ceiling have the following flaws:
- low resistance to moisture and water, which has a strong impact on the deformation process;
- the destruction of sharp temperature differences;
- need to acquire special, not aggressive detergents;
- pretty high price, especially when buying noble trees;
- change color that can manifest due to poor quality processing.
These aspects are necessary in order to take into account, only then can you proper option Processing that will help get rid of some difficulties in the future.

What material to choose
What are the boards for the ceiling to choose? This question is asked by every person who decided to apply this option in the interior or bath interior. Any an experienced master Said that there are no special "ceiling" boards. Therefore, it is necessary to consider some other types of wooden boards:
- lining;
- outdoor board;
- planken.
Each of the species has its advantages and disadvantages that need to be studied before purchase.

Clapboard
One of the most popular types of binder. The lining is a material that was designed to cover the wagons, today is widely used in construction and finishing. There are several classes of lining, separation takes place in quality:
- The highest category A. has the highest price, so not every person can apply it for these purposes. If you want to create an ideal surface, it is better to buy this particular type;
- V. V. On it may be present a small amount of defects that should not interfere with the assembly and the trim;
- Category S. Self cheap type. It may contain not only defects, but the consequences of incorrect production.
Depending on your material opportunities and goals, you can purchase wooden boards in the bath that will fully comply with your requirements.

Floor-shaping
Some builders are specifically chosen this type. After all, such a wooden board is characterized by excellent technical characteristics. With it, you can get smooth surfaceSince it practically does not have a strong relief. There are aspects that need to be considered when buying:
- Do not take care of the ceiling to be too thick, the optimal option is the material of no more than two centimeters;
- You can use a solid parquet board. In addition, it is advised to make designers to create original interior;
- Follow the quality of processing.

Planken as an option to binder ceiling
Planken board ceiling stitch is the most innovative solution. Planken is a board that has passed all the necessary steps of processing:
- drying;
- heat treatment;
- hardening.
Under the influence of high temperature and pressure, the tree acquires good strength characteristics.

The advantages of Planken are:
- very high level strength;
- resistance to microorganisms;
- resistance to water and moisture;
- durability;
- wear resistance;
- attractive appearance;
- resistance to sharp temperature differences.
All this made Planken is extremely attractive both in the eyes of the professionals of builders and lovers. Planken board ceiling cover - an excellent option for trimming a bath or at home.
How to rinse the ceiling in a bath or house
So, you decided to see the ceiling board, now you need to prepare the tools:
- screwdriver;
- corolnic;
- chainsaw or hacksaw;
- roulette;
- pencil;
- a hammer;
- lacing.
First of all, you need to prepare and lay insulation. Common materials are usually used. You also need to buy rubberoid, nails, fiberboard, directly insulation, and mounting foam.

So, below are the stages of performance of work:
- we make high-quality vaporizolation;
- we put the insulation;
- we make a shield that places perpendicular to the ceiling beams;
- noise insulation;
- doom;
- wooden board.
If you fulfill all the work correctly and efficiently, you can significantly increase the life of the ceiling in a bath or house.
Before starting all the work, be sure to see a photo or video on which an experienced master tells all the subtleties and nuances of work. In addition, if your acquaintances independently performed such a job, then be sure to ask the Council or consult. So you can avoid simple, typical mistakes.
Wooden boards For the ceiling is an excellent interior design option in a house or bath. You can combine different types and types of materials, thereby creating a bright and unique design premises.
info-potolki.ru.
Even the draft ceilings without mathematics will not do!
Amend text size:
We have already completed the construction of the roof and now we can safely do in domestic work. In particular, draft ceilings and attic.
As you remember, the slingful system selected by us is made in the form of the letter A. Skates go due to the rafter feet, and the horizontal plane is beams that form the attic on one side, and on the other - the basis for the future ceiling.
Since on the first floor, the entire ceiling is formed at the expense of the plates, it is solid and requires only finishing. But on the second floor, the draft floor is formed due to the roof beams. Preparation of the ceiling of the first floor was simple. In the future we decided to do stretch ceiling (from drywall and other types of finishes refused to reduce the number of works, as well as dirt in the house during installation). For this junction of the plates on the ceiling of the first floor, it is necessary to close (close) with any mixture, which will close the slots so that the garbage from the second floor does not lure through them. Of course, the garbage will be damped will not be a flow, but with small sorts and gradually accumulate behind the stretch ceiling.
So, in any construction store, buy alabastra - construction (or, as still say, white) the mixture is about 10,000 per 12 kg. We needed somewhere five bags. IN plastic container Divide it with water according to the instructions and for 5 minutes the spatula is smelting all the joints between the plates. Instead of alabastra, tile glue is suitable. But in any case, before starting work, thoroughly clean and moisten the surface so that glue and stoves are well closed with each other.
In the draft ceiling cost without a solid board
But the draft ceiling on the second floor demanded a much larger number of works and materials. We will use a cutting board of twenty hundred, as a rule, its stock remains after the construction of the roof, therefore it is not necessary to purchase it. The board may often be with the bark. For her removal there is a special tool, but it can not be bought for one-time work. For example, I performed perfectly with the back of the usual hand saw.
Belonging
How to find out how many boards need?
It is clear that the number of edged board, which you need depends on the ceiling area. How to calculate right? It can be done according to such a formula: the area of \u200b\u200byour ceiling (the above) \u003d width multiplied to the length then divided into 2 and again divide on the area of \u200b\u200bone board. Why is that? Everything is simple, the rough ceiling does not need to be sided with a solid board. We will svew a rough ceiling with a step equal to the width of the board (approximately 10 cm) - it will help to save the material. For example, as it turned out in my case: 80 m2 The whole ceiling, divide by 2, we get 40 m2 and divide on the area area
(Boards are 3 meters, and there are 2.5 m). We had a 3 meter board. The area of \u200b\u200bone board is obtained - somewhere 0.3 square meters. After all mathematical calculations it turned out that we need 133 boards. But, of course, ordering boards needed with a margin - to shine another 10 - 15 pieces. But the tree is not sold in square meters, but in cubic! The volume is calculated by a simple formula: the area of \u200b\u200bthe desired amount of boards multiply on their height.
In our case, it turned out one cube.
How not to spoil the climate of the future at home?
Following required Material - vapor barrier film. You can buy it in any construction store. Approximately 30 - $ 40 per roll in 70 - 80 squares. How much to buy? Depends on the ceiling area, but be sure to lay the reserve on the adhesive. In general, for a ceiling area of \u200b\u200b80 squares, I took two rolls - in the farm, such a film is always useful.
The feature of the film is that she misses the pair only in one direction. Therefore, if you misinterpret vaporizolation, you will have dampness in your room, increased humidity, and the attic will be cold - a word, because of the incorrect actions, the climate in the house can be seriously changed. Typically, the film has a smooth side and rough, the instructions indicate which side it should be attached.
You still need thermal insulation, assembly staples and construction (furniture) stapler. Post the screwdriver and do not forget the screws for the tree (I needed about 400 pieces). If you have a roof with places cut, as in our case, then when buying a insulation, consider the skates - they need to be inspired immediately when you sew the ceiling, otherwise you will simply not get to them. If you have a ceiling completely rectangular, then you just put the insulation from the side of the attic without unnecessary fuss. Buy the insulation need a minimum thickness of 15 cm (and even better - 20 cm). It stacked tight - from one rafter to foot to another. Recall, the step of the rafter we did 60 cm precisely because the standard insulation (it doesn't matter, in the stoves he or rolls) goes just such a width: in this case it will be convenient to cut it. Recommendations for the insulation layout will always be written in the manual for it. But it is important to always make a nest: in this case there are no direct end-to-end joints between the heaters' slices. The fact is that in time the insulation can be challenged, the joints between it will increase, and you will have to eliminate these gaps.
"Move on the packed board is prohibited!"
To deal with draft ceilings you will need two people and two days of time. So it is quite possible to cope with your own. First build reliable layouts that will allow you to get it before you need a height (in our case - 2.7 meters). On beams or rafters (if the roof is cut) the stapler needs to be fixed. Cut a piece of film on the width of the room with a small margin. Then take a twentyness and over vapor barrier in the very corner of the planes (wall ceiling) screw the screw to the beam. One screw is screwed in every beam (rafter foot). For a three-meter board, the number of screws of about five: we checked on loads in 80 kilos - everything is withstanding! Then we take the second board and screw it in increments of 10 cm. By the way, in order not to measure the distance with a roulette every time, you can take a piece of twenty pens and use it with it. Repeat this procedure until you reach the edge of vaporizolation. Here, do not hurry to wind the next board, take another piece of vapor barrier, bring it to the ceiling and then close the board.
After you complete the binder of the draft ceiling, you can drain the insulation on the attic and put it tightly, with the allen. Remember: the role of a draft ceiling is to hold the insulation, and not you. Therefore, it is forbidden to adopted on the shaft board - it's not enough that you can fail, so also damage everything you did. How to work? We, for example, in the attic between the beams did the flooring from the board or laid out the pallets from under the bricks.
If you have roof slices in the rooms, as it was with us, the insulation is laid as the ceiling with boards - then it is extremely difficult to get to the bottom of the skate. Chief Council: Do not save on the insulation and its thickness. Thickness of about 20 cm will be very good! In addition, if the insulation is in the form of plates (and they cost more than rolls), then it will be easier to work with it, and thermal and physical qualities will be better. Since in the garage we have an attic room and the garage adjoins the house, we performed there exactly the same procedures and laid the ceiling board.
"The ceiling is more convenient to hed up without partitions"
After you have completely laid a rough ceiling and figured out with insulation, you can report interior partitions. The ceiling is more convenient to heat without them!
Interior partitions are made in Polkirpich from the same material as the main walls. They do not carry large loads, but they need to competently, so that someday this partition suddenly has not collapsed. Sometimes interior partitions are made of drywall, but we chose a brick. In the process of erection of walls, builders laid a special grid for dressing partitions with basic carriage walls.
What is important to remember:
In addition, the jumpers are needed over any doorway, but as the partition in the Pollipich and the dimensions of the jumpers are small, you can ask the builders to pour a jumper in order to not buy them separately at the factory. Well, and note that the builders consider the cost of partitions not by cubes, but square meters: it turns out more expensive, because it is not so important element in the construction of the future at home.
TOTAL: $ 890
rough ceiling.